Custom Global Header in Divi  | How to Create header using The Divi Theme Builder in WordPress

Custom Global Header in Divi | How to Create header using The Divi Theme Builder in WordPress

In this blog we will learn How to Create Custom Global Header in Divi. After reading this blog you will know the easiest way to create Website Header using simple drag and drop option in divi.  

Before we start with “How to create, edit or alter Custom Global Header in Divi Builder” make sure that you have WordPress installed with latest Divi Builder plugin or Divi Parent Theme installed.

You can Edit, Create or Alter Header in Divi Theme or Divi Builder just by drag and drop no source code or Development skils are required. 

With the help of this blog you will be able to Develop awesome Global Header with The Divi Builder. You just have to follow few simple steps mentioned below and your Header is ready to go.

If  you are searching for How to make custom header in Divi, Divi custom menu or Customize Div Header using Divi Theme Builder you are at right place.  

Step 1 : Login to WordPress Dashboard and navigate to “Divi ->Theme builder “. Divi Theme builder will appear from here you can customize 3 most important element of Divi Theme builder. They are 
    • Global Header
    • Global Body
    • Global Footer

Changes done here will reflect on each and every page of the website

Note:-  Custom Divi Global Header is only visible on page created using Divi Builder. If your header is not displayed on any of the page of your website check if it’s created in Divi or not.
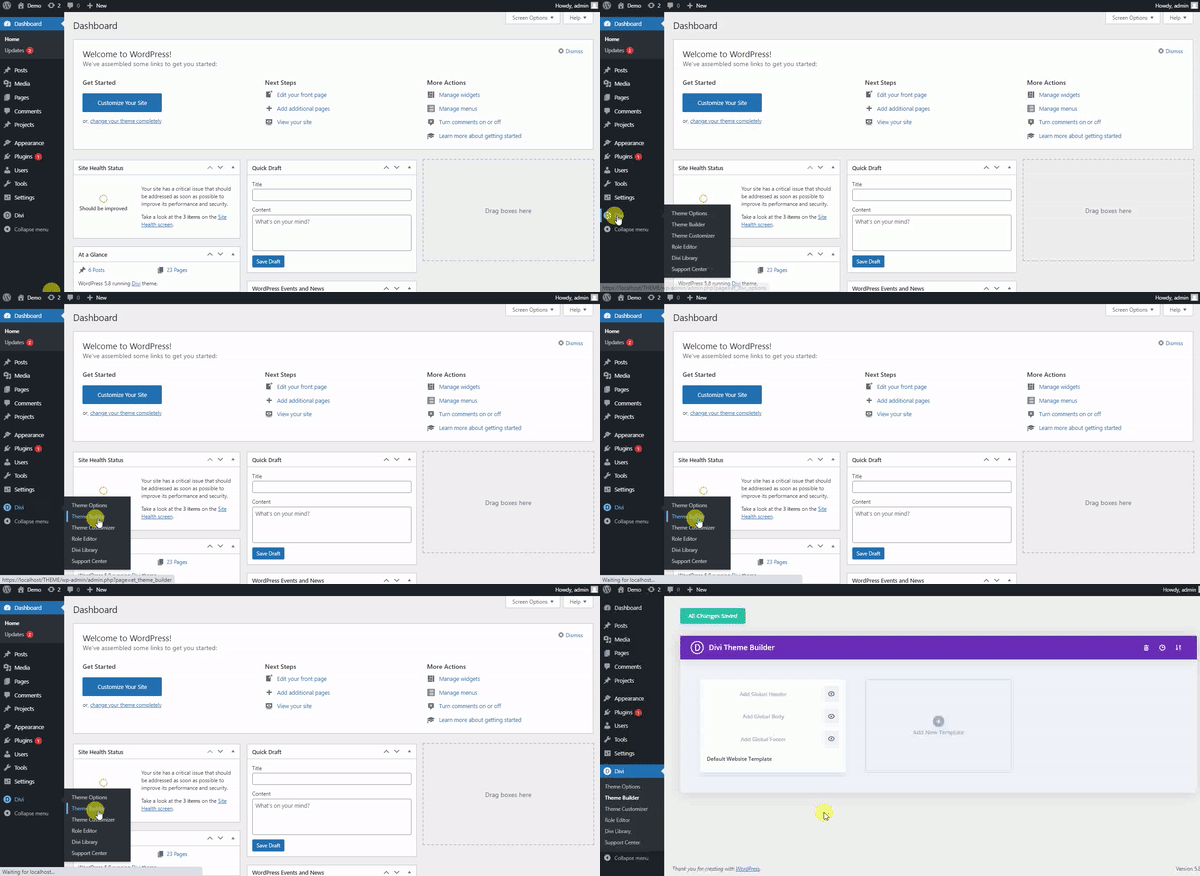
Open Divi - Theme Builder
Step 2 : In Theme builder Click on “Add Global Header -> Build Global Header” you will be redirected to another page. Here you can use all Theme Builder functionality to create Global Header.
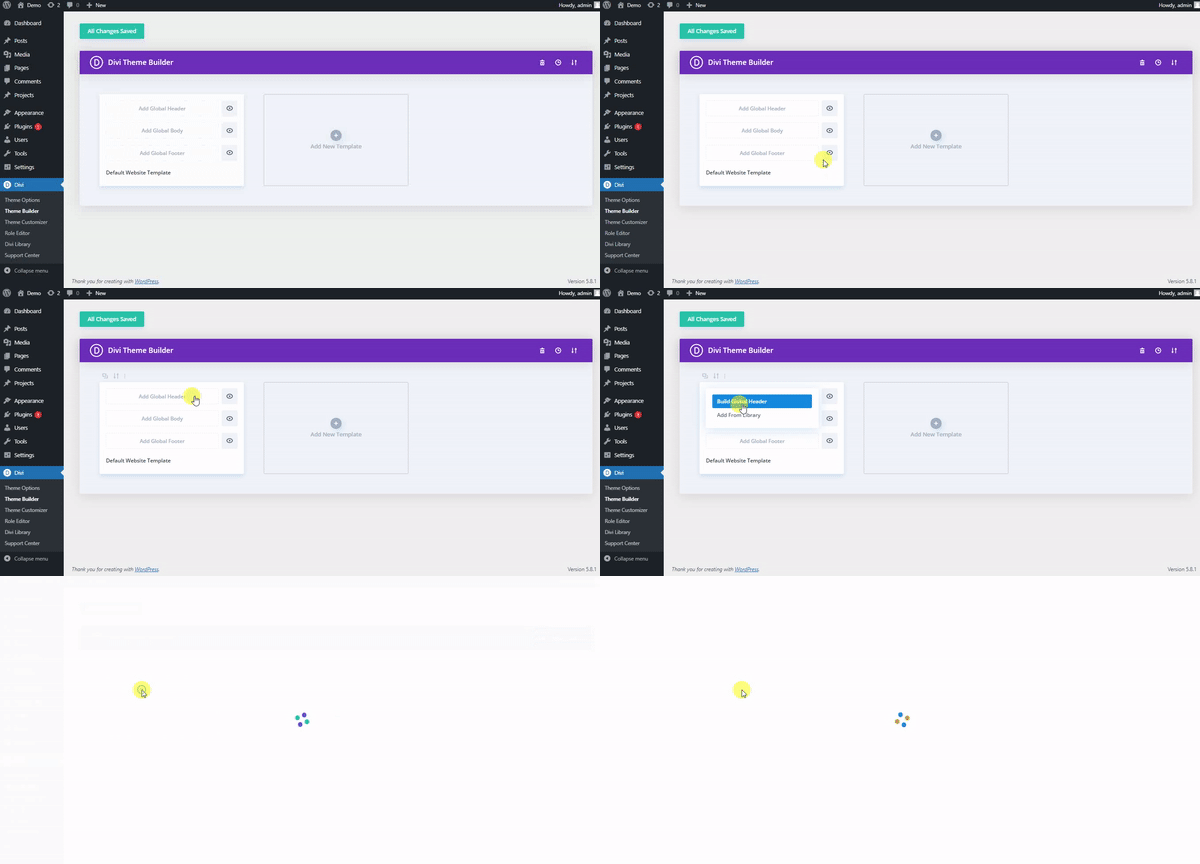
Add Global Header - Build Header
Step 3 : Click on “Start Building” to create customized Header. “Insert row” Box will appear, here we have to add row with 3 columns layout as shown in image below. You can also change row layout as per your requirement.  
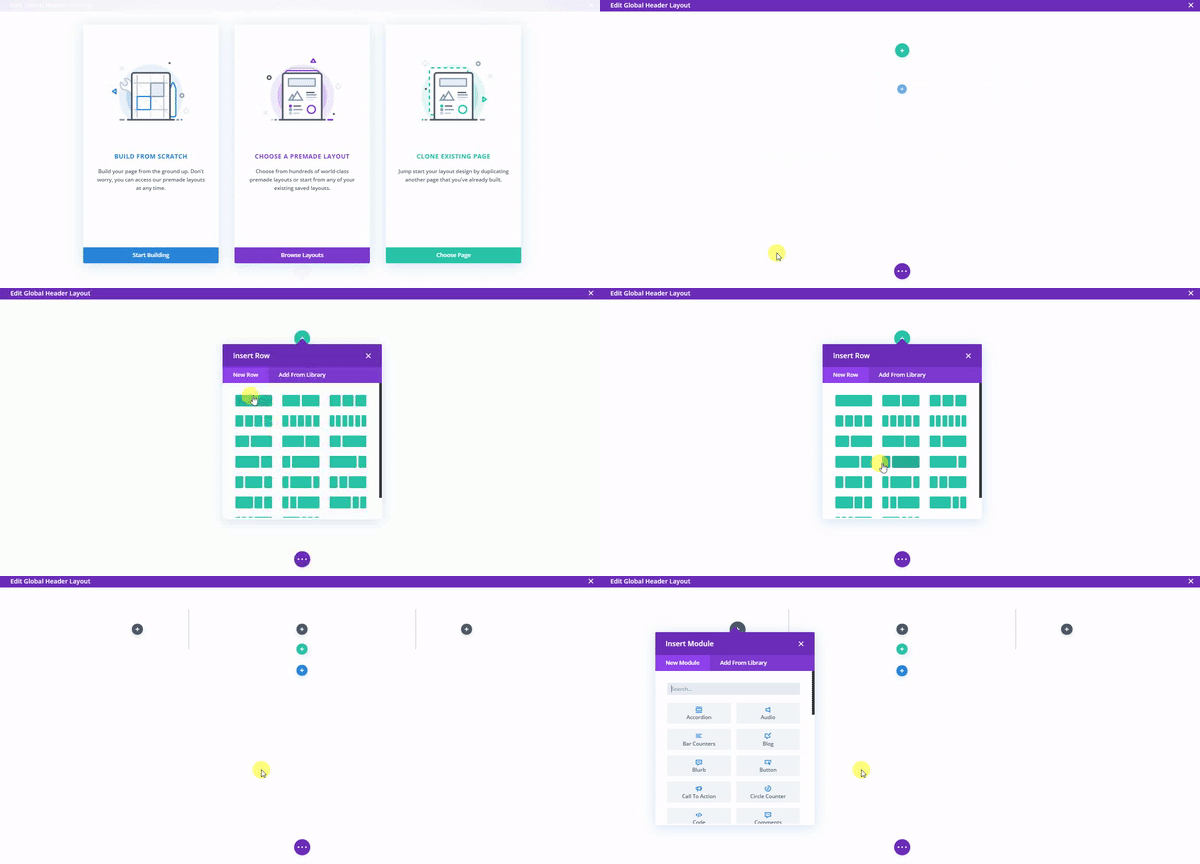
Divi Theme Builder Customization of Header in Divi
Step 4 : Click on the section setting and navigate to Background as per your choice,  you can assign color, image or gradient from “content -> Background”   as shown below.
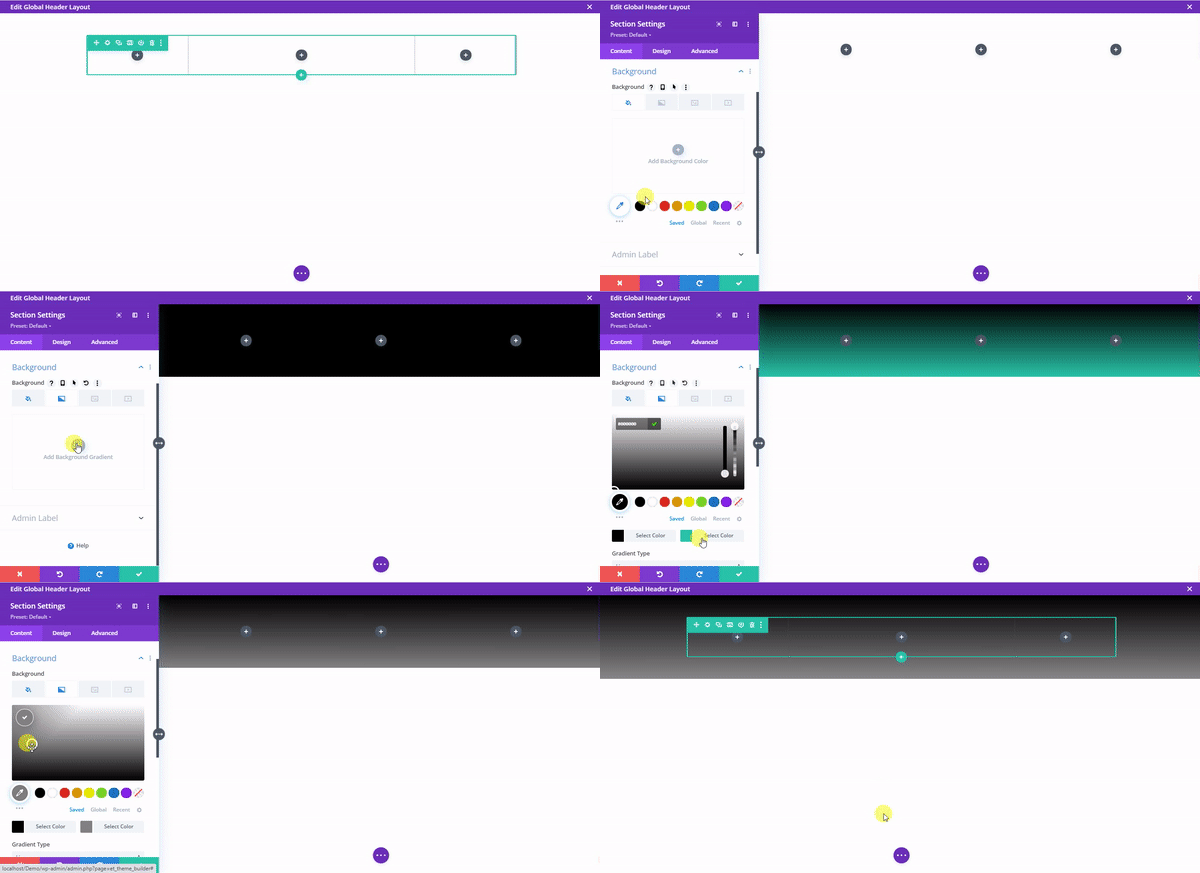
Divi Theme Builder Customization of Header in Divi
Step 5 : As you can see height of the header is more then we need. To reduce it open Section setting and go to “Design” tab and then select “Spacing” here set top & bottom padding to “0px”.   
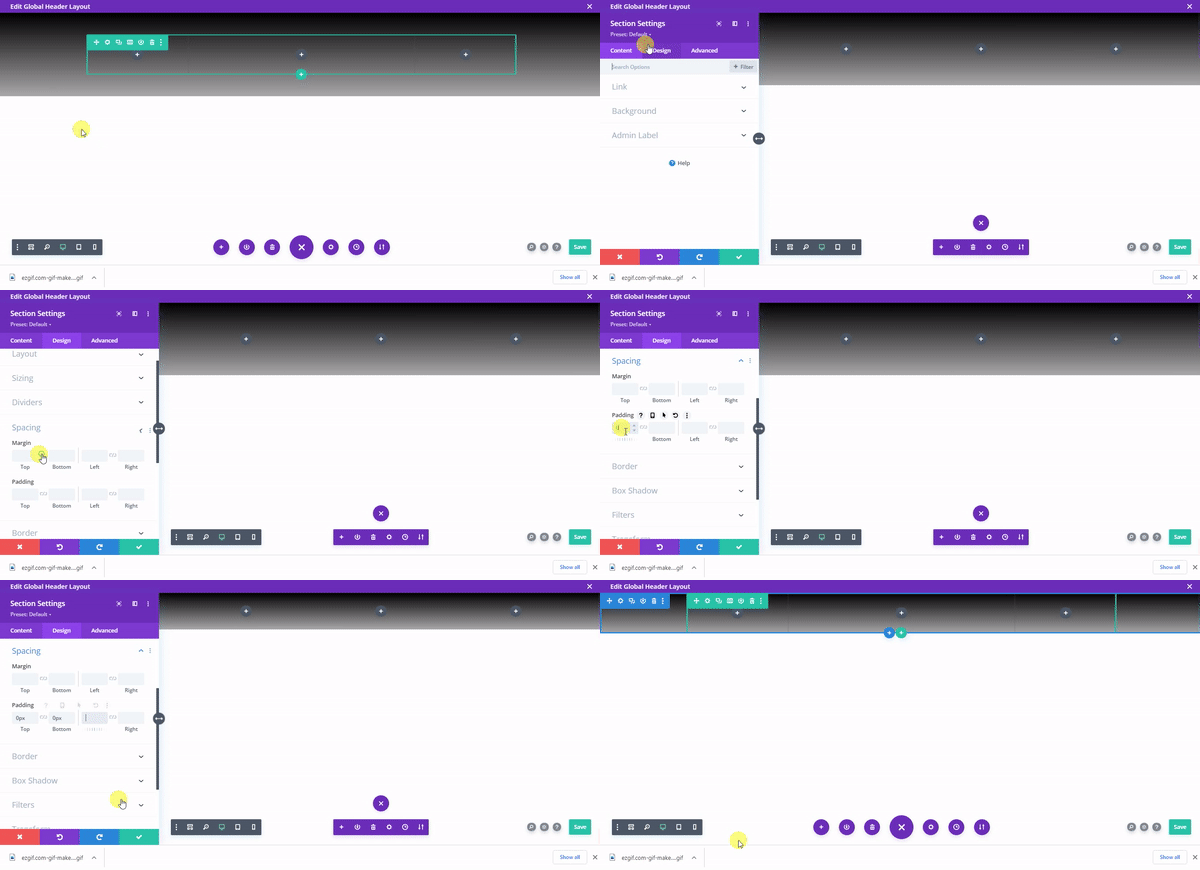
Divi Theme Builder Customization of Header in Divi
Step 6 : It time to place logo if you don’t have don’t worry we will create text logo here.

 Click on “+” to add module and select “Text” module from the list after that “Heading 1” Option from dropdown and follow steps show below in image to create text logo.

Note :- We can also add Site Logo. We will discuss that in another tutorial. 
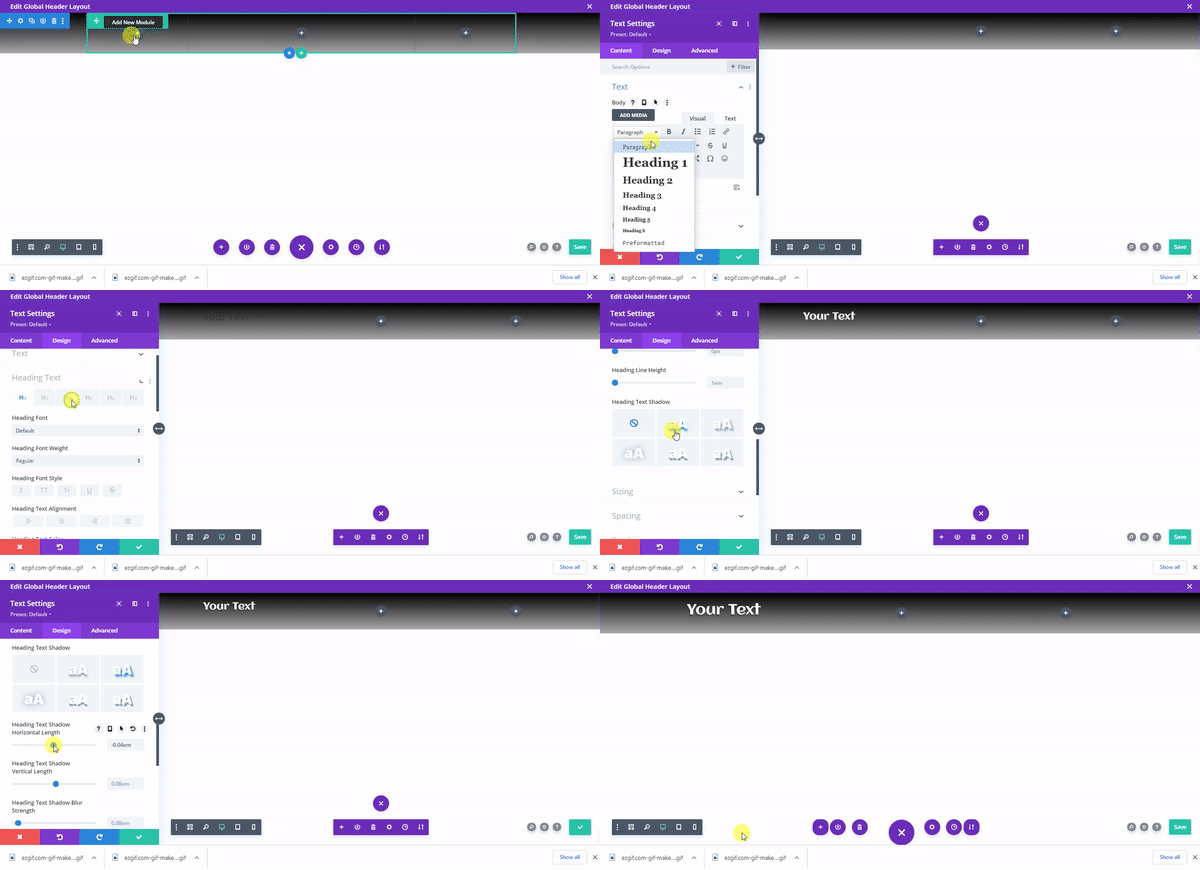
Divi Theme Builder Customization of Header in Divi
Step 7 : Now let’s add Navigation Menu to our header.

To add menu again click on ‘+’ and select “Menu” module then select menu you want to display, remove background  and apply other setting as shown below from “Design” tab.
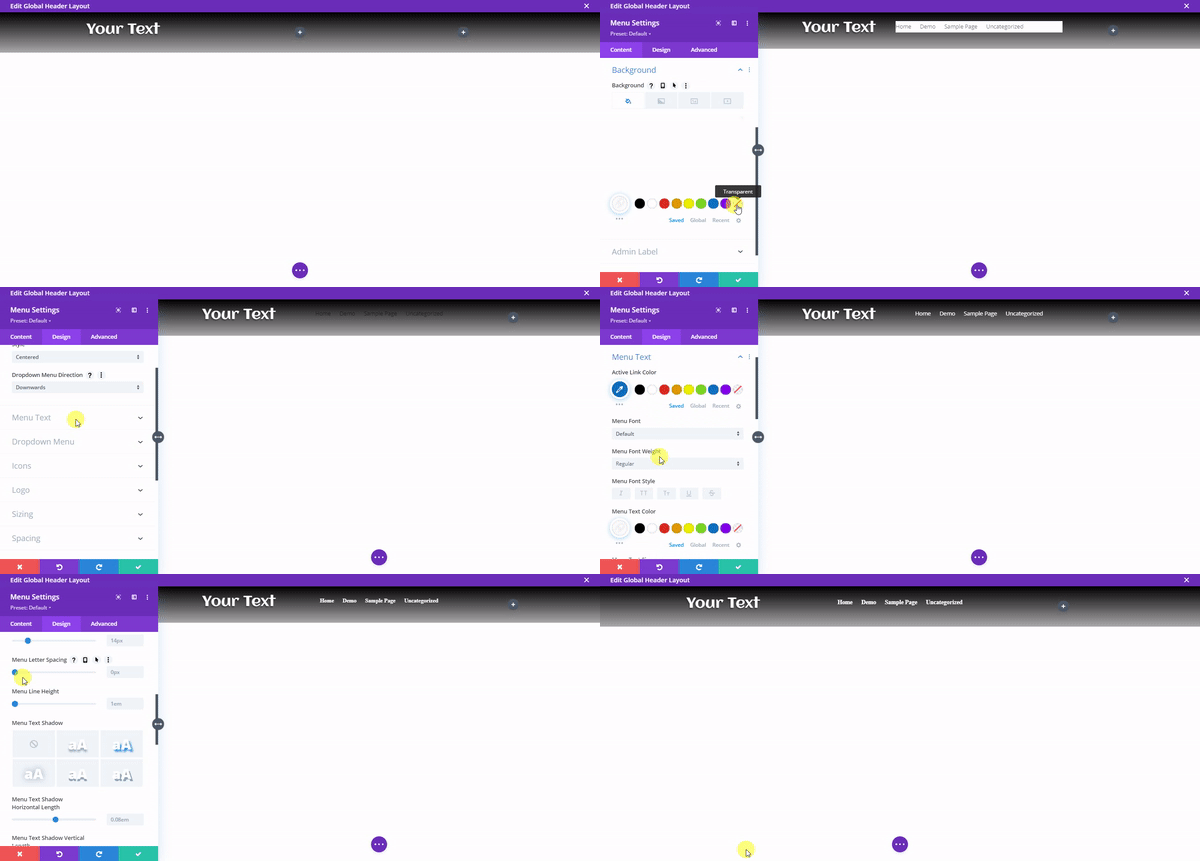
Divi Theme Builder Customization of Header in Divi
Step 8 : Let’s add login button in 3rd column 

To add button click on ‘+’ in 3rd column and select button then type our text in button text section and make it appear good by changing some styles as shown below. 
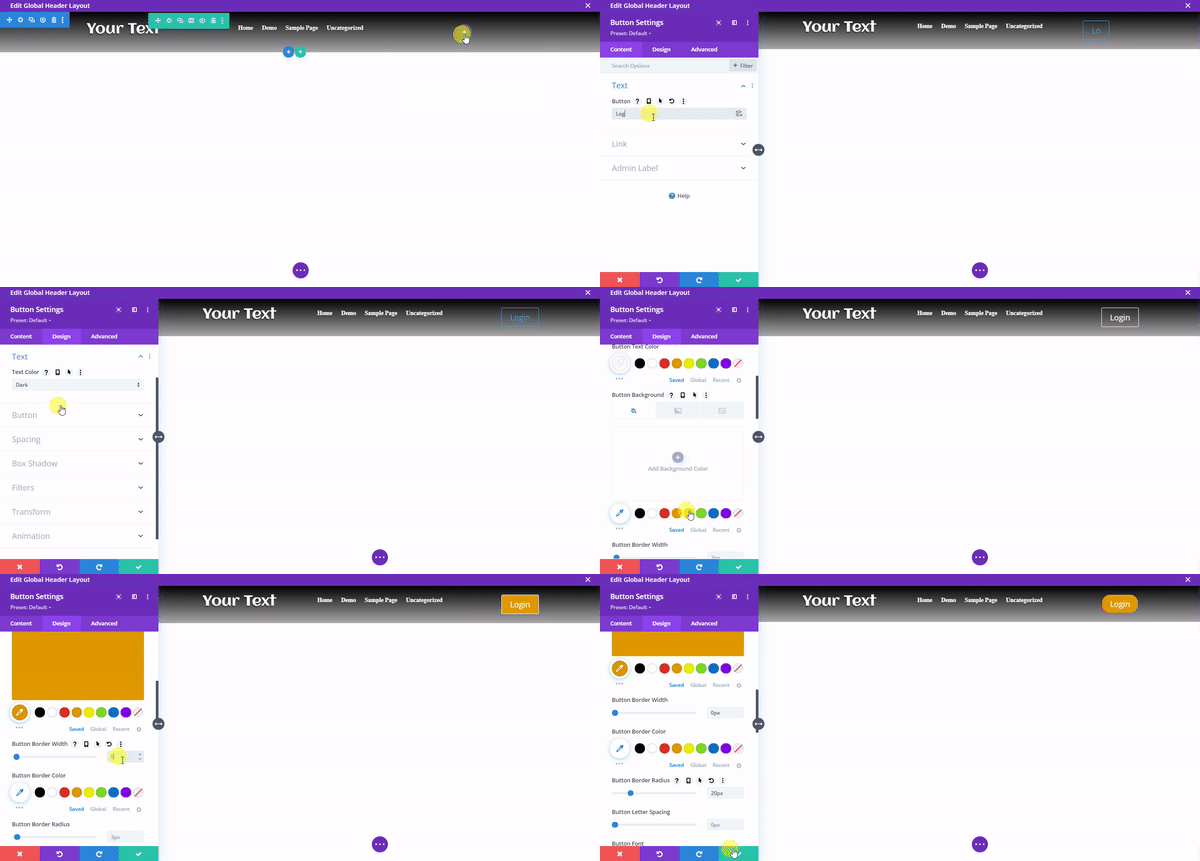
Divi Theme Builder Customization of Header in Divi
This Tutorial is also Helpful if you are looking for
  1. How to Create a Custom Divi Global Header with The Divi Theme Builder in WordPress
  2. Create Divi header layouts using Theme Builder
  3. How do I create, edit or change a global header in Divi Theme Builder?
  4. How do I add a header in Divi theme

 The Divi theme have millions of pre-made Themes that you can import to use on your site just in One Click. However, to take your website to the next level you need something extraordinary. To make your work more fast & easy check our Free Divi Themes. Here you will get themes for almost all type of websites. We provide free as well paid Divi Child Themes & Single Page Layouts.  

You can also create sticky menu in divi. To transform existing or create new sticky / fixed  header will also post tutorial soon stay tuned.

How to Install WordPress Locally Using XAMPP

How to Install WordPress Locally Using XAMPP

This Topic Will Show You How To Install WordPress Locally Using XAMPP

To Install WordPress Locally Using XAMPP on your Local Machine just follow this 5 steps described below it will definitely help you.

Step 1 : Download wordpress.

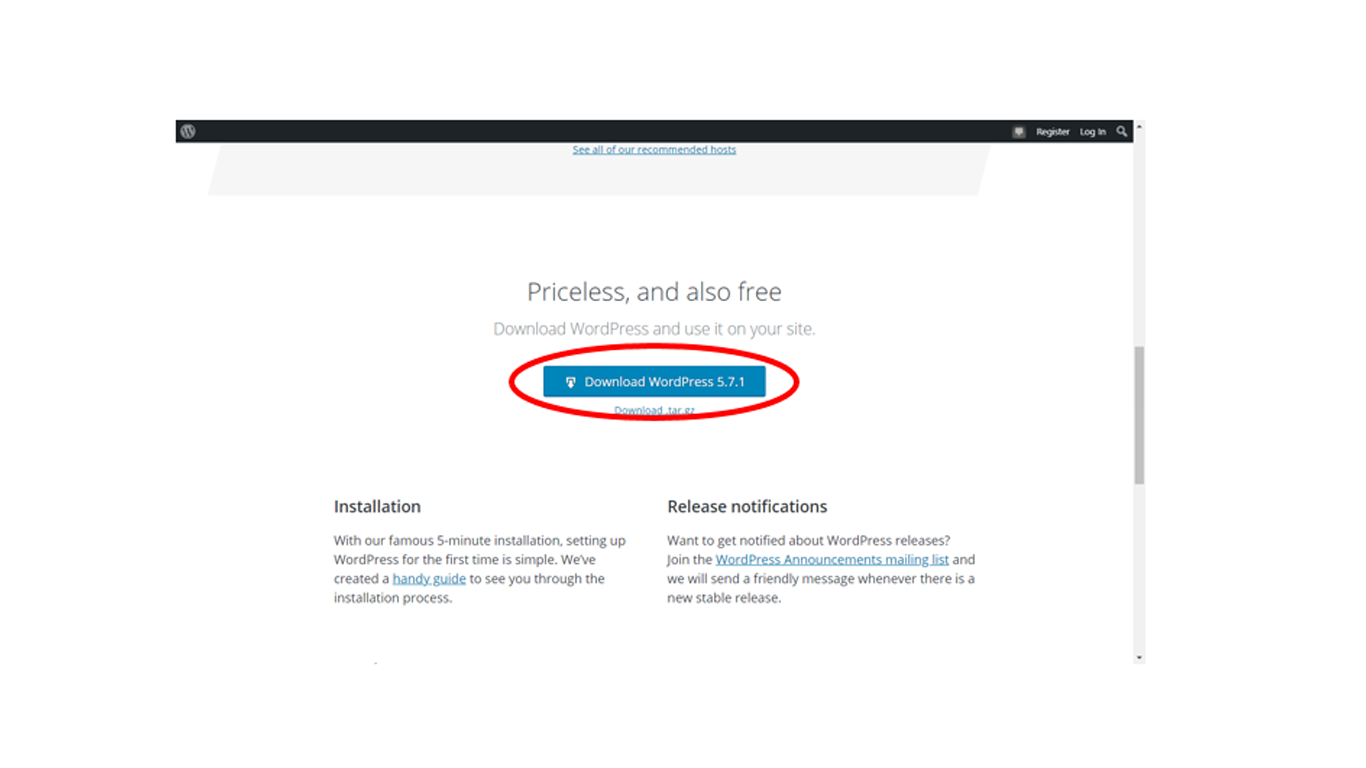
Download wordpress setup from wordpress.org . Download as A Zip Folder as shown below.

To Install WordPress Locally Using XAMPP
Step 2 : Create New Wordpess Project In XAMPP

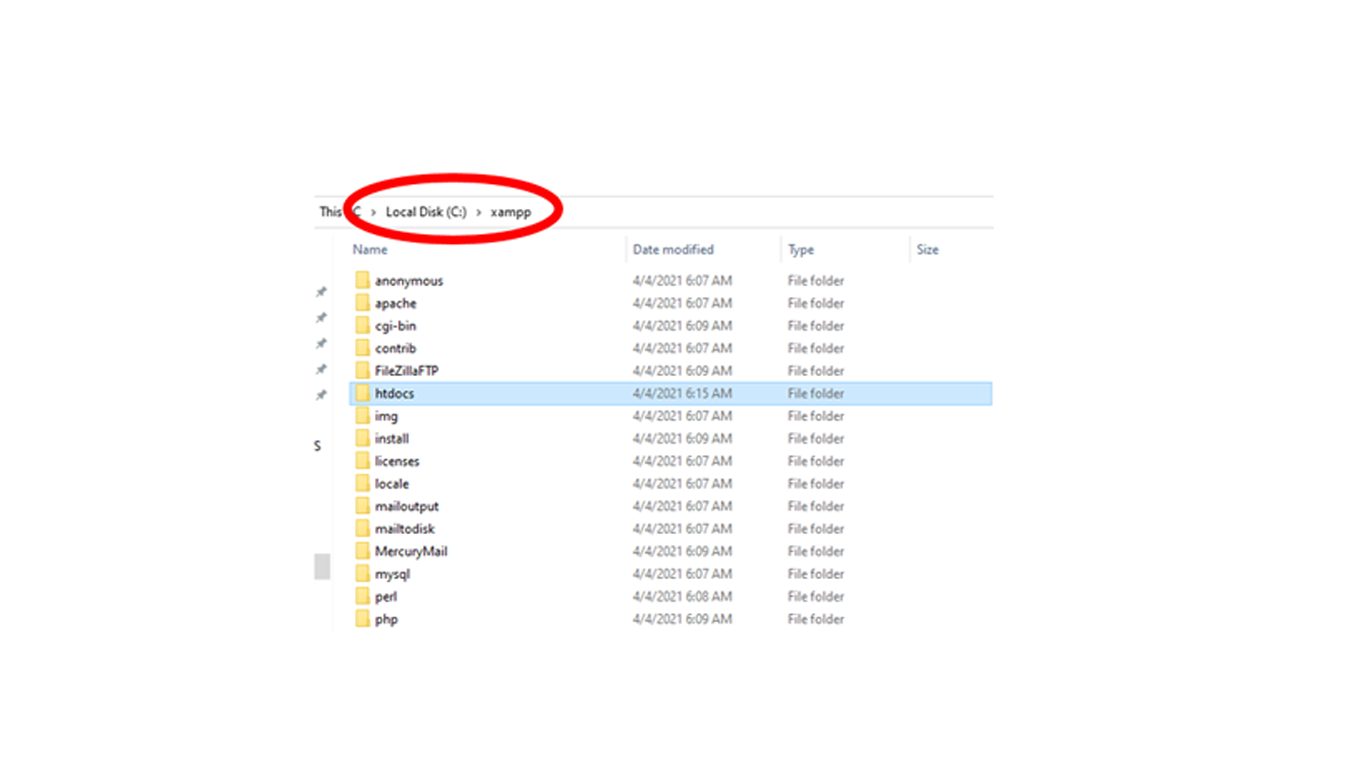
For instance navigate to the folder where you installed XAMPP. By default its C:\\xampp. It Should be same for you if while installing XAMPP you have not changed the path manually. After that find the htdocs subfolder

To Install WordPress Locally Using XAMPP

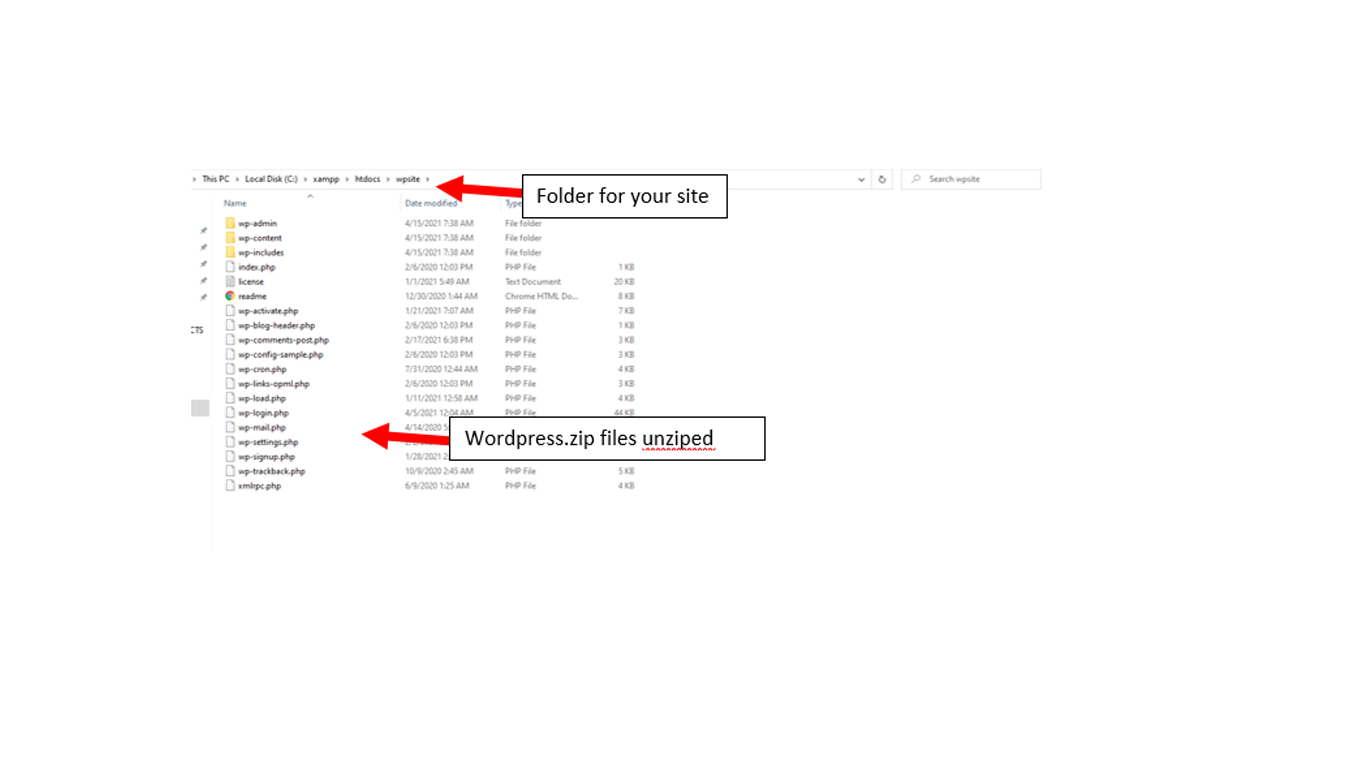
In htdocs, create a folder for your WordPress site. This folder name will need to be as the sub-name used to access your site. For example, if you make the folder wpsite, you’ll login using URL to your site by typing as http://localhost/wpsite .

After creating sub folder, unzip the WordPress.zip file you downloaded into folder you created.

To Install WordPress Locally Using XAMPP
Step 3 : Create Database for WordPress

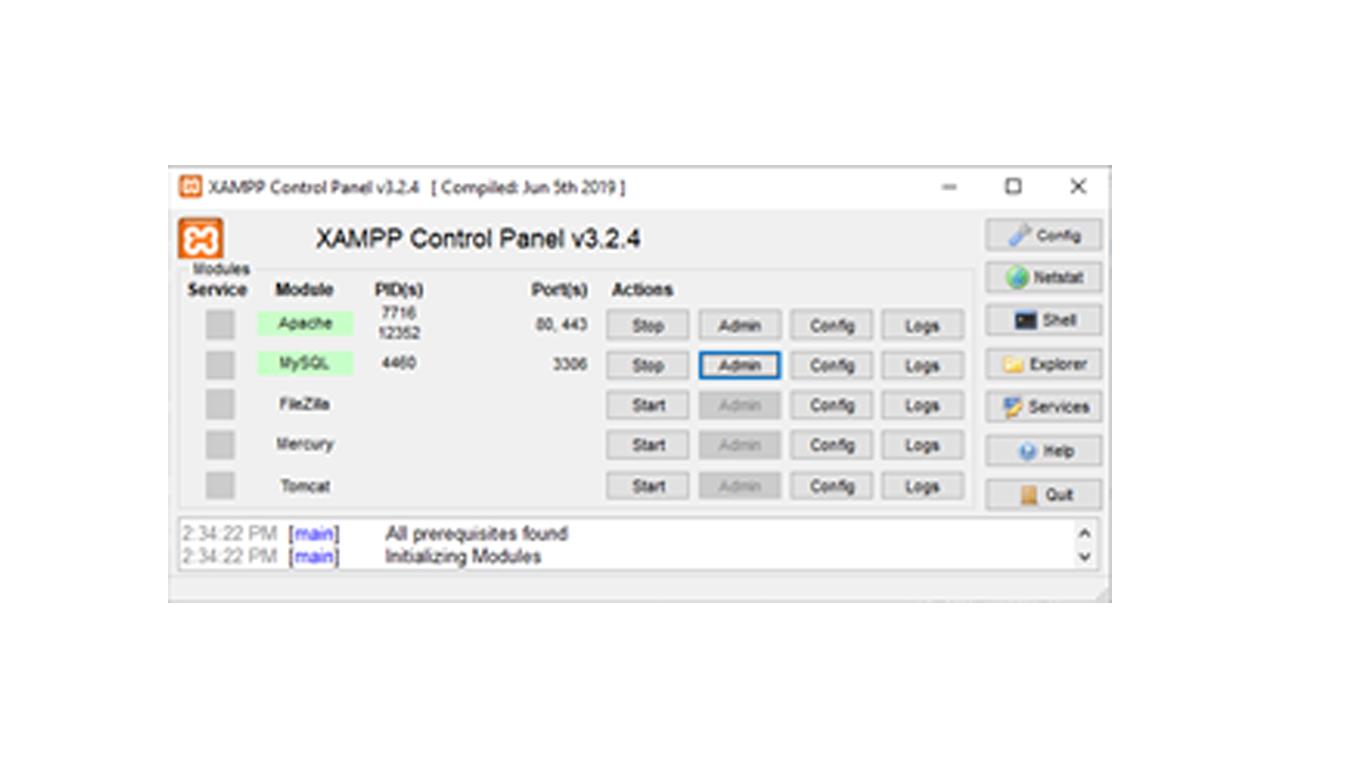
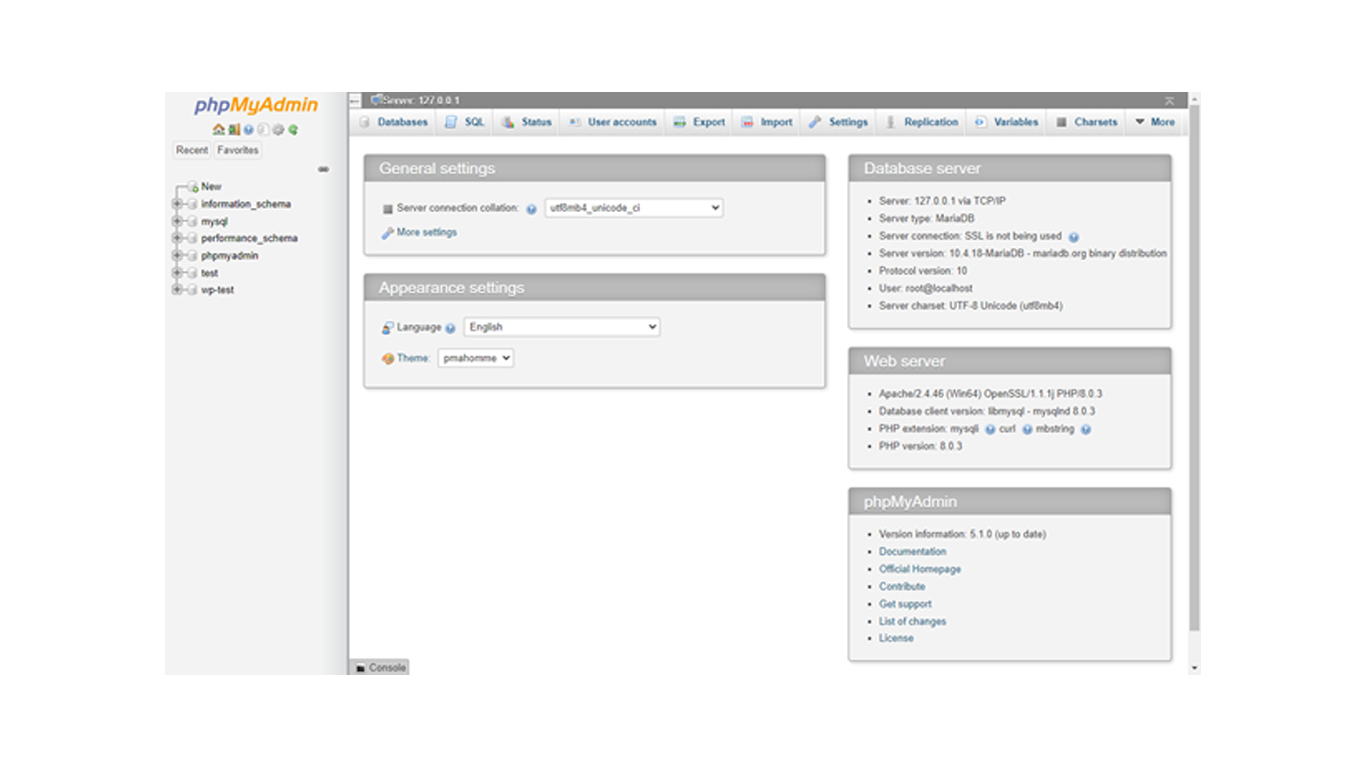
After Creating site, Now its time to created database for your wordpress. To create Database launch PHPMyAdmin from your XAMPP control panel by clicking on admin button in MYSQL row.

To Install WordPress Locally Using XAMPP

After that hit on New at left side in PHPMyAdmin.

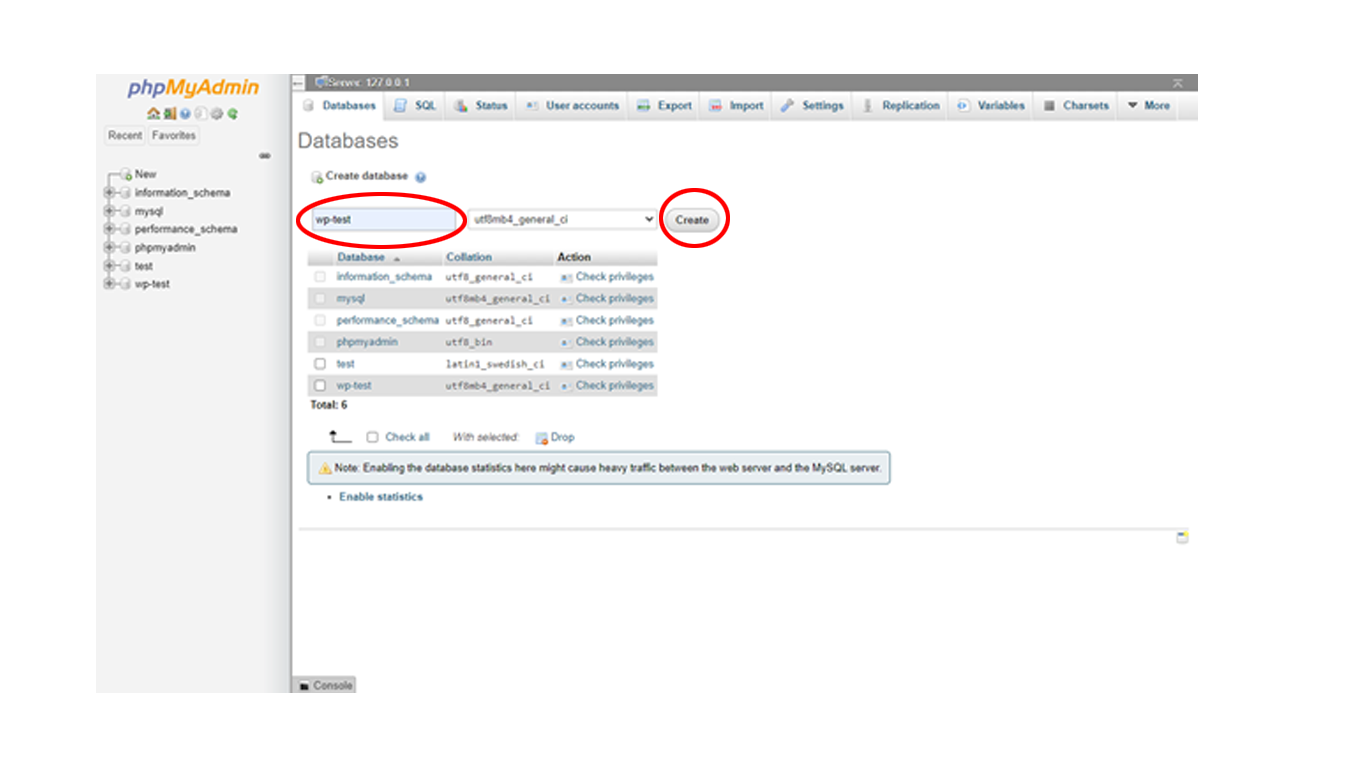
Finally you have to give appropriate Name of database and click on Create

PHPMYADMIN Database
Step 4 : Open Website to Start WordPress Installation

lastly we have to visit our website, Here you will see the normal WordPress installer. Note that your website link is http://localhost/subfoldername:

Now select your language and hit on continue to see the next page.
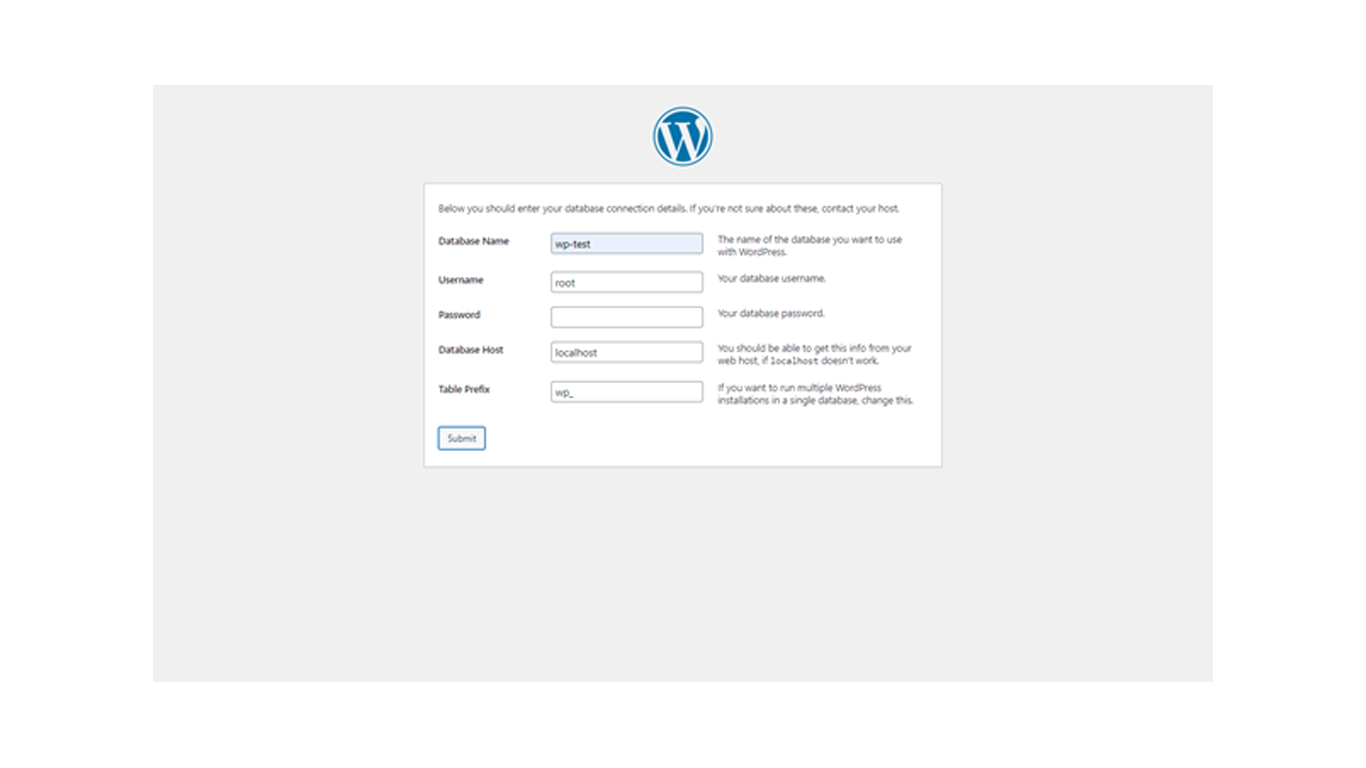
After that wordpress installer will ask you details of database. Here we need feed details you have already created ie database details that is ‘ Database Name / User ‘ you have created .

Wordpress Installation Details

Note that by default for Admin login username is root & password is for local XAMPP.

Step 5 : Start the Installation & Fill in Website General Details

Now click on sumbit & then on next page click on “Run the installation”

Here installer will ask other details like your Site Title, User Name & Password to login WP-Dashboard and your email.

Fill in following and click Install WordPress.
 

Complete the process ie installing wordpress locally using XAMPP on your local Machine process is completed !


Click Here To Join Our Facebook Group For More Tutorial & Tips.


How to Install/SetUp Divi Child Theme on WordPress

How to Install/SetUp Divi Child Theme on WordPress

Are you worried about how to Install/SetUp DIVI Child Theme on WordPress? or Worried about DIVI Builder installation?

Then you are on the right way

Here is the list of Minimum requirements which we want while you install/Setup your DIVI Child Theme or Divi Builder:

  • WordPress Version : 4.9.4
  • PHP Version : 5.6.x+
  • MySQL Version : 5.7.x+

We can Install/SetUp Divi Child Theme on WordPress by 2 methods They are as discussed below.

Installation stepsInstall/SetUp Divi Child Theme on WordPress via Zip upload installation method :

Note : make sure uploads up to 2MB are allowed for your hosting):

1. Login to your WordPress site administrator panel and head over to the Appearances -> Themes

2. Click ‘Add New’

3. Choose the ‘Upload’ option.

4. First Activate Divi Parent Theme By Uploading a copy Available With You.

5. Install and activate child theme copy you have.

6. After activating Child Theme at the top you will see the notification as ‘ begin installing plugin’ plugin name: ‘one click demo import’. Click on that link to install concern plugin.

7. Go To “Appearance”. Click on “Import Demo Data” and Click on “Import Demo Data” Button. This will import ‘Child Theme ’ Content into your site.

8. Go to Appearance > Menus. Assign the menu as the primary menu.

9. Go to Divi and Click on “Child Theme Settings” and set additional settings As per need.

10. To Import Logo You Need Import JSON File : Go To “Divi Theme Option”. Import JSON file by clicking arrow as shown in screenshot below in “Divi Theme Options.” and Click on “Import.—————————————–

Installation stepsInstall/SetUp Divi Child Theme on WordPress via FTP upload installation method:

1. Upload ‘Child Theme ‘ folder to the /wp-content/themes/ directory using your FTP client as well copy of ‘Divi Parent Theme You Have’

2. Activate the Theme through the ‘Appearance – > Themes ‘Menu’

3. Go to the ‘ Word Press Admin ‘ and repeat step “1 to 10” above

4. Finally enjoy it.—————————————–

Check Installation Video:
https://youtu.be/FegAn7JCRYE

Subscribe To Our YouTube Channel For Divi Help & Tutorial

How To Speed Up Divi or WordPress Site

How To Speed Up Divi or WordPress Site

How To Speed Up Divi or WordPress Site ?

We come across various social media platform that how to speed up Divi Site or Website.

I myself was running very slow, with page load times of 10+ seconds. This was bad in terms of annoying the hell out of my users and making Google take a dim view of my website too. You can test your site performance using free online tools such as Pingdom or GTMetrix. GT Metrix gives you a nice results page that outlines where you may be going wrong which makes it much easier to plan what needs to be done

Steps to Speed up or Optimize your site:

A. Try Install Cache Plugins as mentioned below.

Top 3 Free Fastest WordPress Caching Plugins

  • WP Fastest Cache : https://wordpress.org/plugins/wp-fastest-cache/ Active installations : 500,000+
  • W3 Total Cache : https://wordpress.org/plugins/w3-total-cache/ Active installations : 1+ million
  • WP Super Cache : https://wordpress.org/plugins/wp-super-cache/ Active installations : 1+ million

B. Compressing & Resizing Images:

Top Plugins that will help in Optimizing images or Better you do it manually.

  • WP-Smush:

WP-Smush Plugin URL

  • EWWW Optimizer Plugin:

EWWW Optimizer Plugin

C. Remove query strings from static resources : Remove query strings plugin > This plugin does exactly what it says on the tin. Resources with a “?” or “&” in the URL are not cached by some proxy caching servers, so moving the query string and encode the parameters into the URL will increase your WordPress site performance significant.

D. CDN to improvise page speed time > Best CDN:

E. WP Performance Score Booster > WP Performance Score Booster

  • minify JS and CSS file which will include two phases of Optimization Minify and Combine
  • Enable GZIP compression (compress text, html, javascript, css, xml and so on)
  • Add Vary: Accept-Encoding header
  • leverage browser caching

F. Delete WP post and page revisions – WP-Optimize: Plugin allows you to quickly delete them (and other entries cluttering up your database) and free up your database for faster processing times.

G. Run Latest Divi version & Update WordPress version / Themes etc

H. Install security plugins that might slower the website:

ITheme Security Plugin URL

WordFence Plugin

I. Upgrade your Hosting to latest PHP version and clear cache at Hosting side.


Click Here To Join Our Facebook Group For More Tutorial & Tips.