Custom Global Header in Divi  | How to Create header using The Divi Theme Builder in WordPress

Custom Global Header in Divi | How to Create header using The Divi Theme Builder in WordPress

In this blog we will learn How to Create Custom Global Header in Divi. After reading this blog you will know the easiest way to create Website Header using simple drag and drop option in divi.  

Before we start with “How to create, edit or alter Custom Global Header in Divi Builder” make sure that you have WordPress installed with latest Divi Builder plugin or Divi Parent Theme installed.

You can Edit, Create or Alter Header in Divi Theme or Divi Builder just by drag and drop no source code or Development skils are required. 

With the help of this blog you will be able to Develop awesome Global Header with The Divi Builder. You just have to follow few simple steps mentioned below and your Header is ready to go.

If  you are searching for How to make custom header in Divi, Divi custom menu or Customize Div Header using Divi Theme Builder you are at right place.  

Step 1 : Login to WordPress Dashboard and navigate to “Divi ->Theme builder “. Divi Theme builder will appear from here you can customize 3 most important element of Divi Theme builder. They are 
    • Global Header
    • Global Body
    • Global Footer

Changes done here will reflect on each and every page of the website

Note:-  Custom Divi Global Header is only visible on page created using Divi Builder. If your header is not displayed on any of the page of your website check if it’s created in Divi or not.
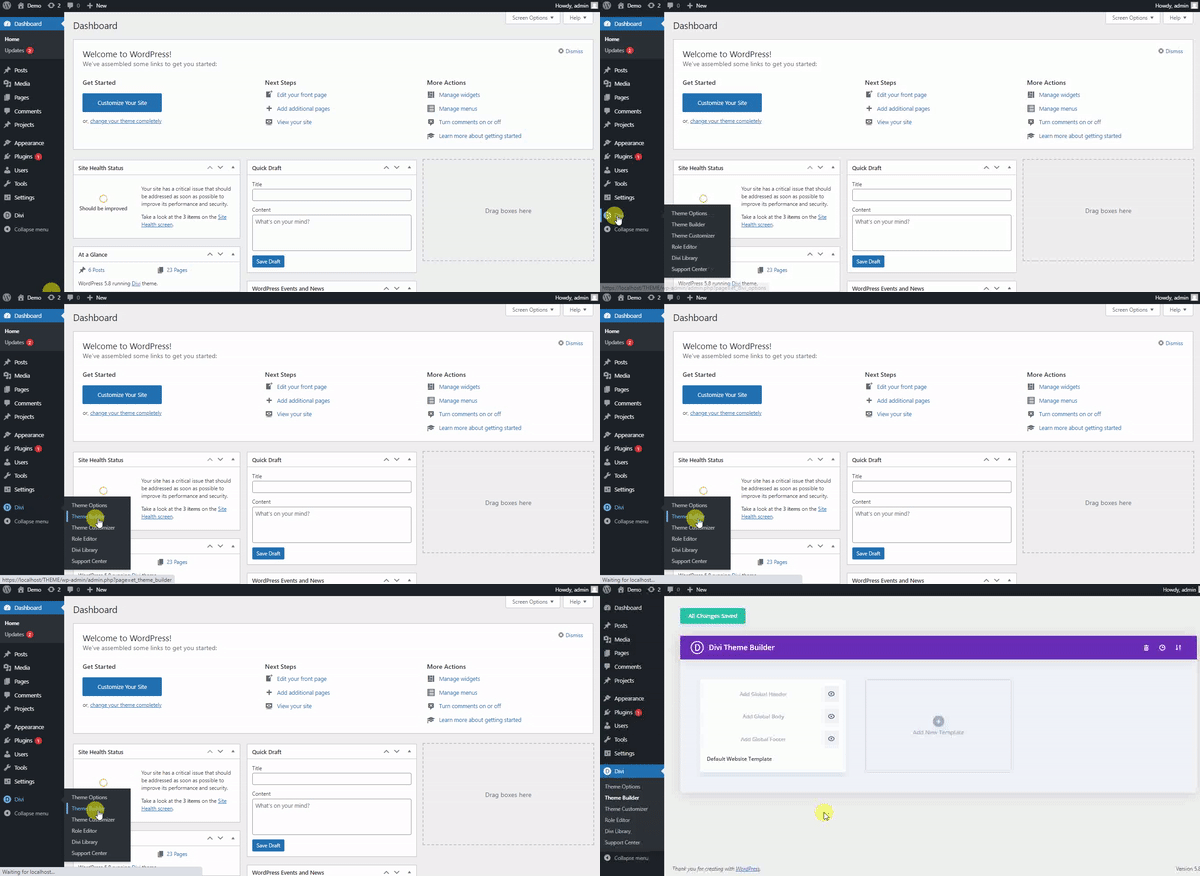
Open Divi - Theme Builder
Step 2 : In Theme builder Click on “Add Global Header -> Build Global Header” you will be redirected to another page. Here you can use all Theme Builder functionality to create Global Header.
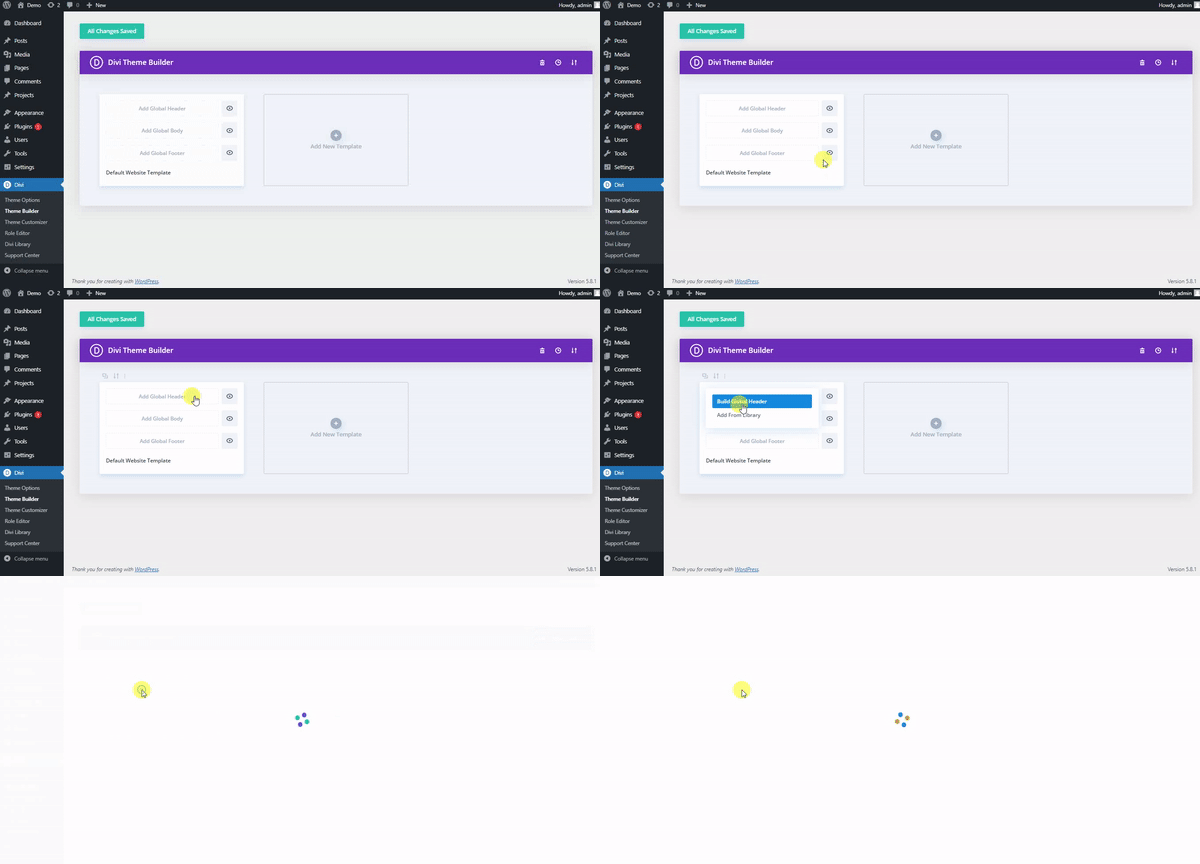
Add Global Header - Build Header
Step 3 : Click on “Start Building” to create customized Header. “Insert row” Box will appear, here we have to add row with 3 columns layout as shown in image below. You can also change row layout as per your requirement.  
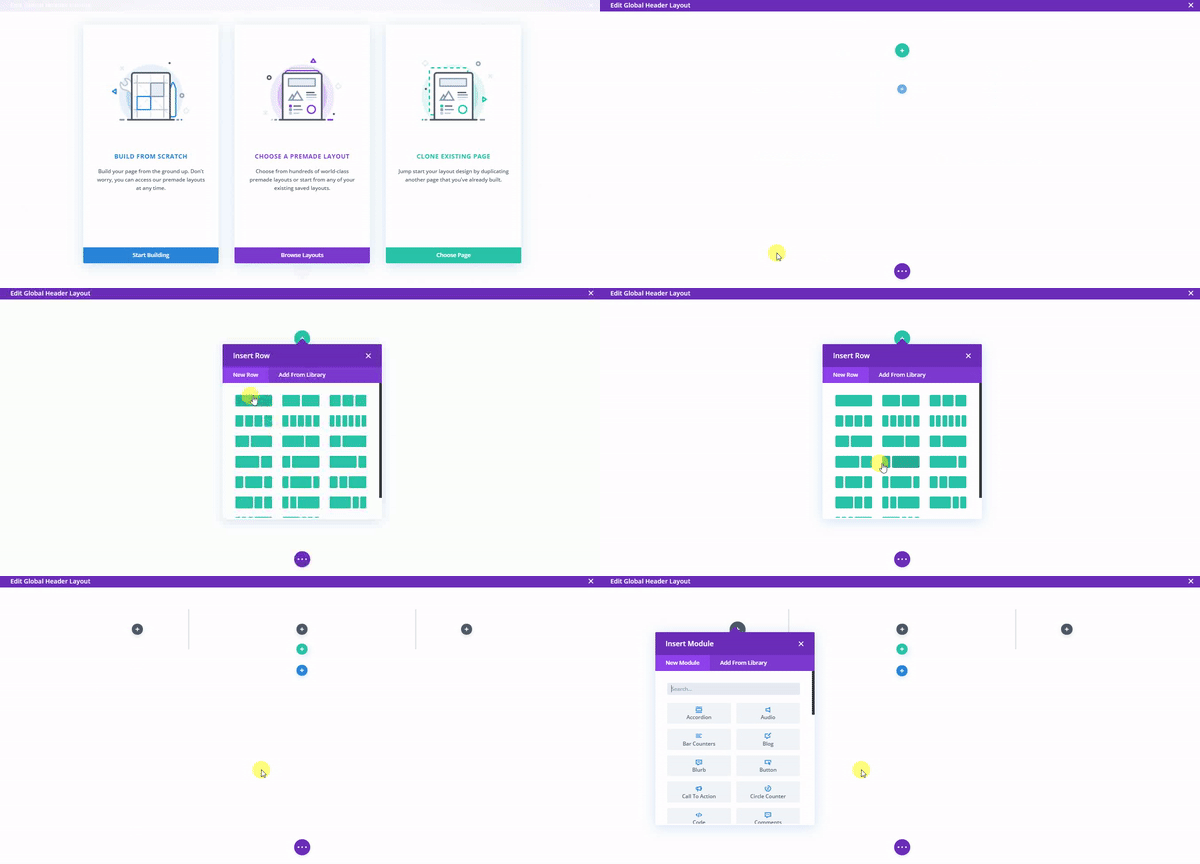
Divi Theme Builder Customization of Header in Divi
Step 4 : Click on the section setting and navigate to Background as per your choice,  you can assign color, image or gradient from “content -> Background”   as shown below.
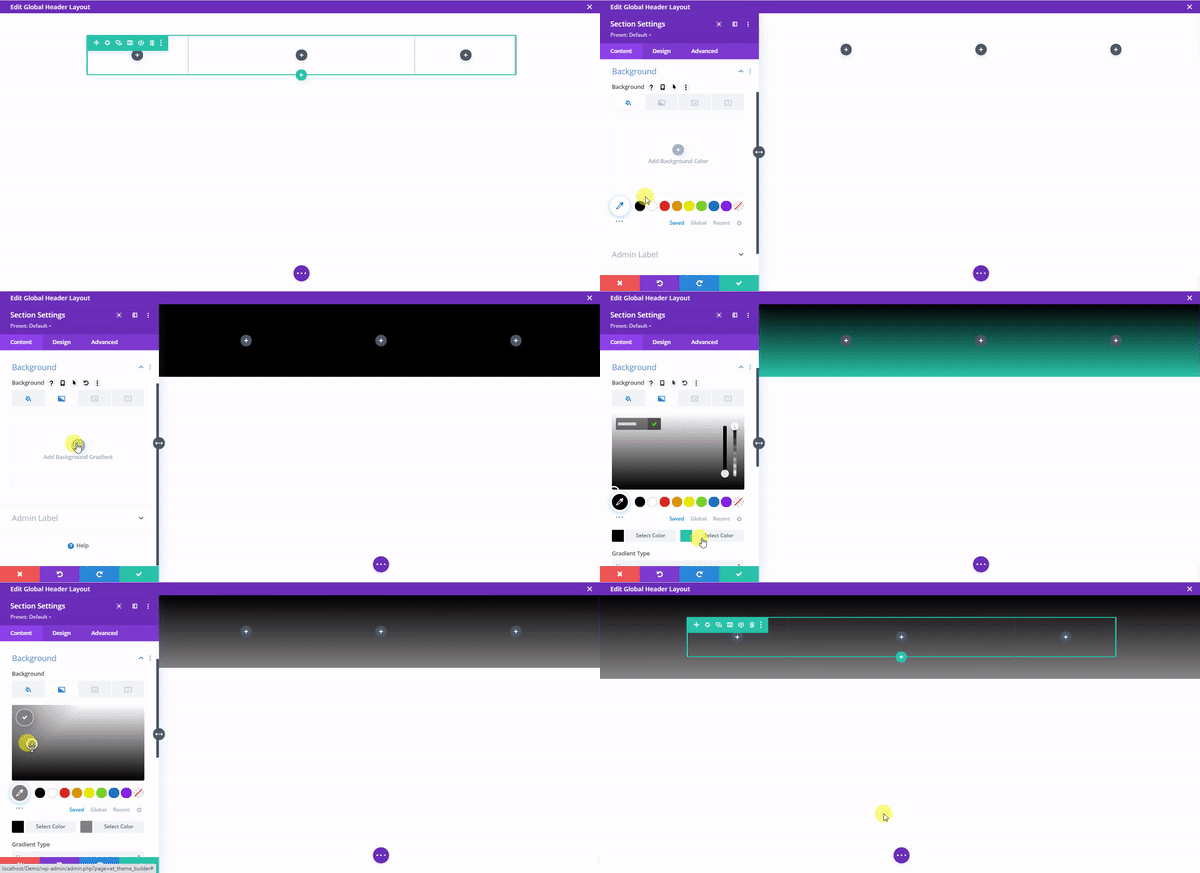
Divi Theme Builder Customization of Header in Divi
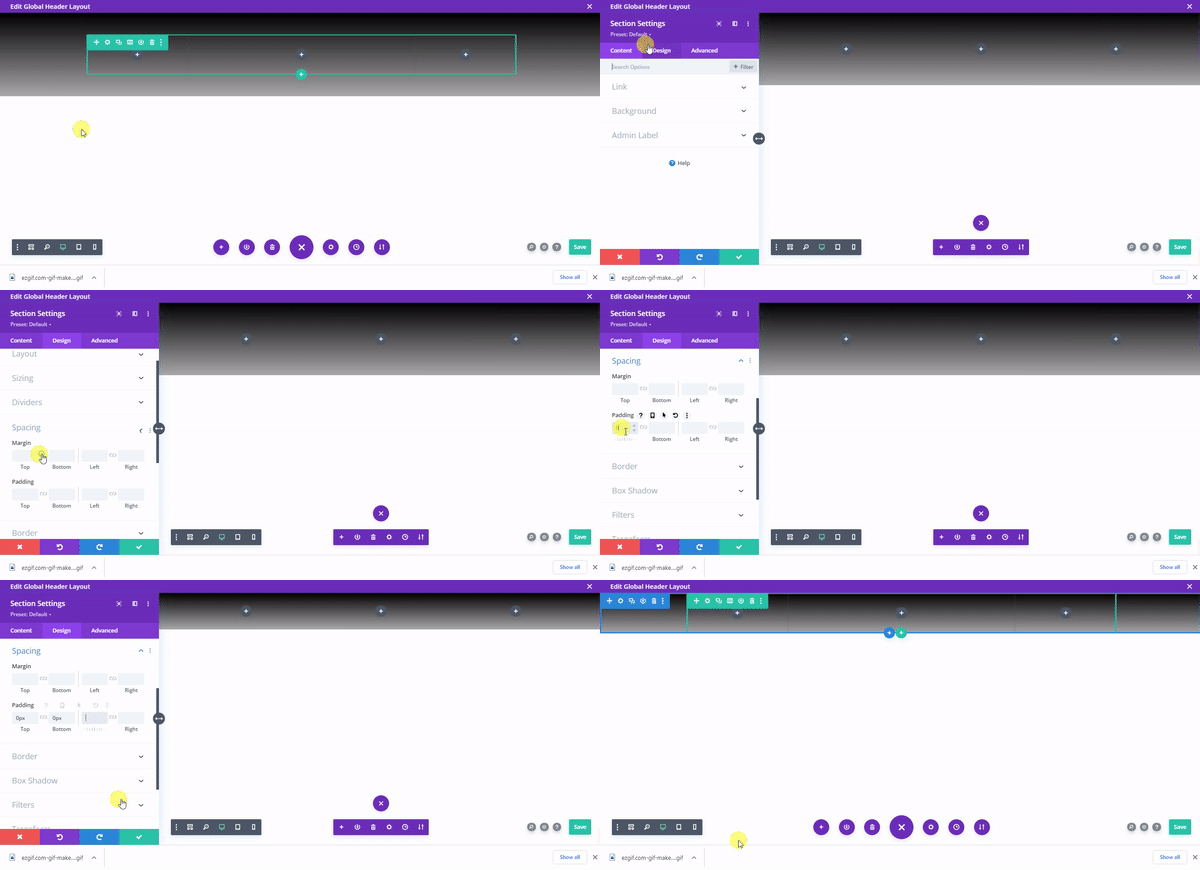
Step 5 : As you can see height of the header is more then we need. To reduce it open Section setting and go to “Design” tab and then select “Spacing” here set top & bottom padding to “0px”.   
Divi Theme Builder Customization of Header in Divi
Step 6 : It time to place logo if you don’t have don’t worry we will create text logo here.

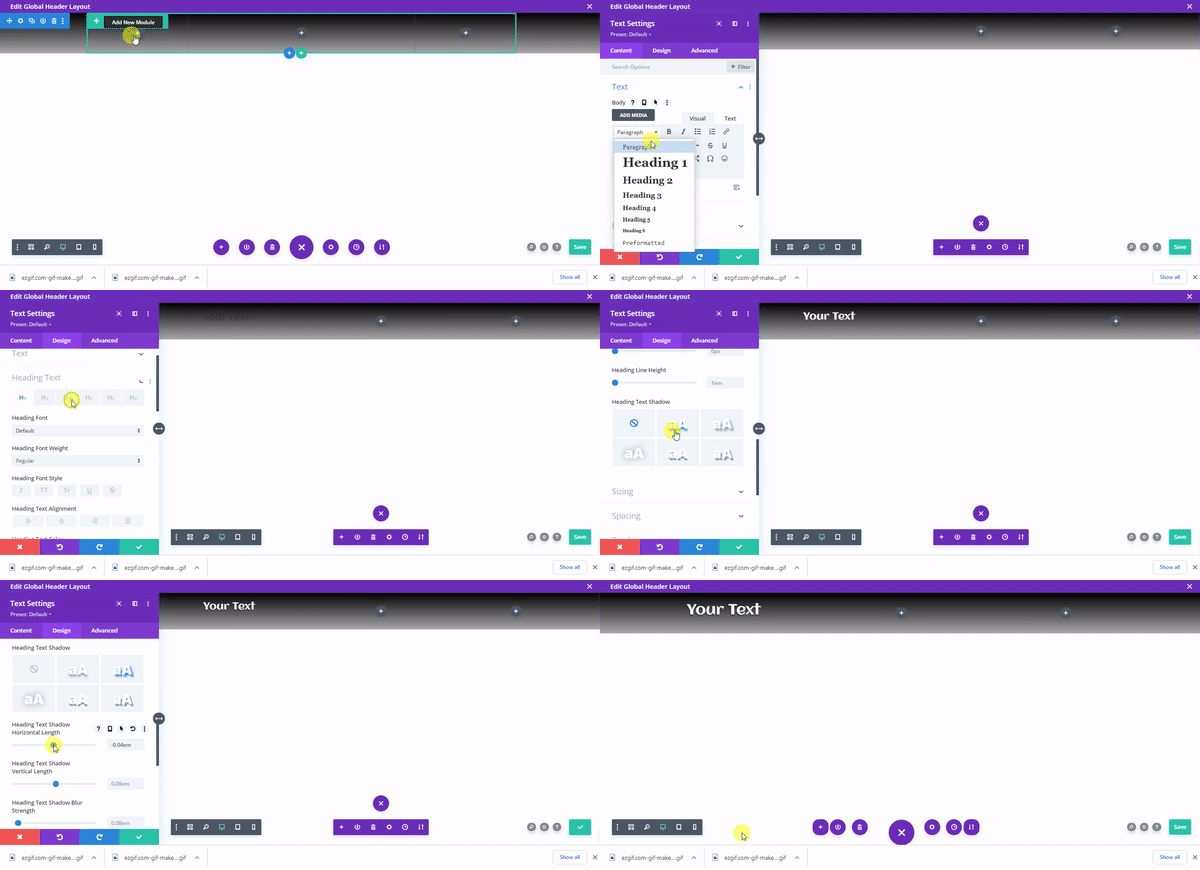
 Click on “+” to add module and select “Text” module from the list after that “Heading 1” Option from dropdown and follow steps show below in image to create text logo.

Note :- We can also add Site Logo. We will discuss that in another tutorial. 
Divi Theme Builder Customization of Header in Divi
Step 7 : Now let’s add Navigation Menu to our header.

To add menu again click on ‘+’ and select “Menu” module then select menu you want to display, remove background  and apply other setting as shown below from “Design” tab.

Divi Theme Builder Customization of Header in Divi
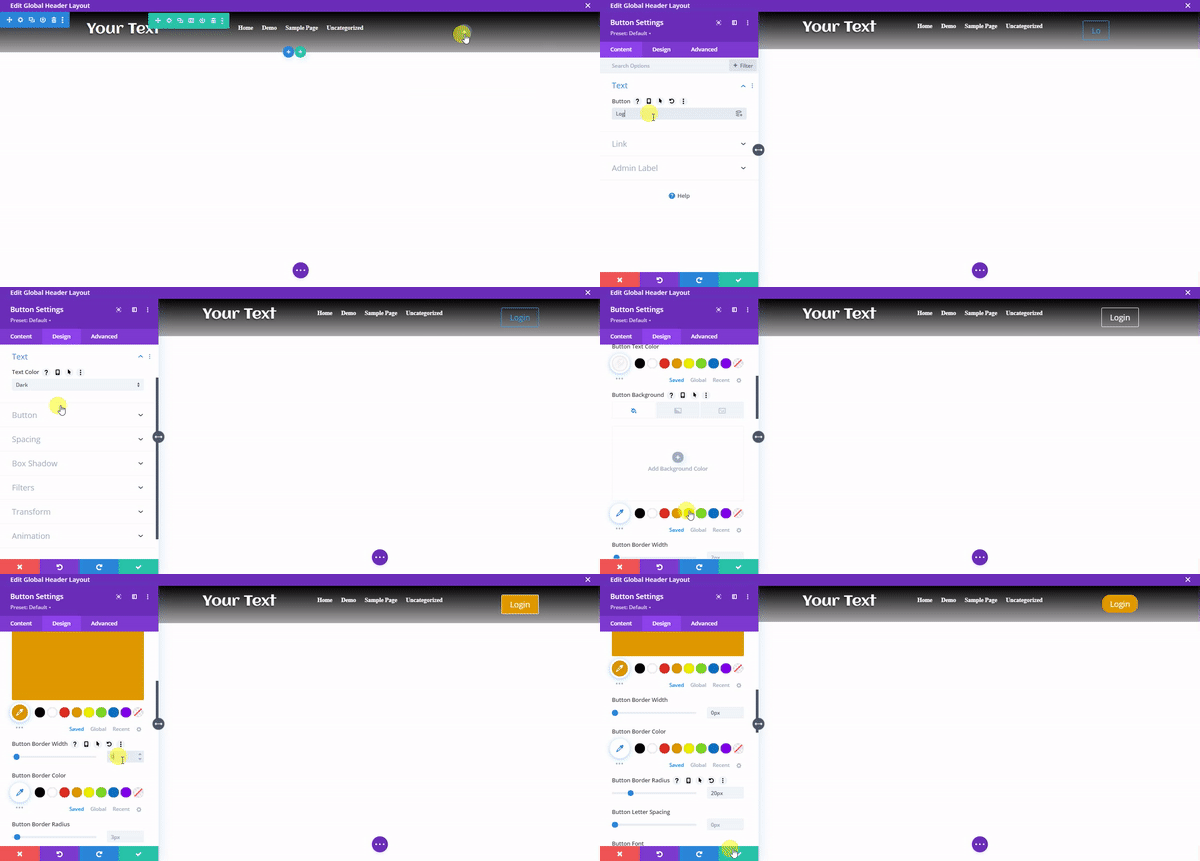
Step 8 : Let’s add login button in 3rd column 

To add button click on ‘+’ in 3rd column and select button then type our text in button text section and make it appear good by changing some styles as shown below. 
Divi Theme Builder Customization of Header in Divi
This Tutorial is also Helpful if you are looking for
  1. How to Create a Custom Divi Global Header with The Divi Theme Builder in WordPress
  2. Create Divi header layouts using Theme Builder
  3. How do I create, edit or change a global header in Divi Theme Builder?
  4. How do I add a header in Divi theme

 The Divi theme have millions of pre-made Themes that you can import to use on your site just in One Click. However, to take your website to the next level you need something extraordinary. To make your work more fast & easy check our Free Divi Themes. Here you will get themes for almost all type of websites. We provide free as well paid Divi Child Themes & Single Page Layouts.  

You can also create sticky menu in divi. To transform existing or create new sticky / fixed  header will also post tutorial soon stay tuned.

How to Install WordPress Locally Using XAMPP

How to Install WordPress Locally Using XAMPP

This Topic Will Show You How To Install WordPress Locally Using XAMPP

To Install WordPress Locally Using XAMPP on your Local Machine just follow this 5 steps described below it will definitely help you.

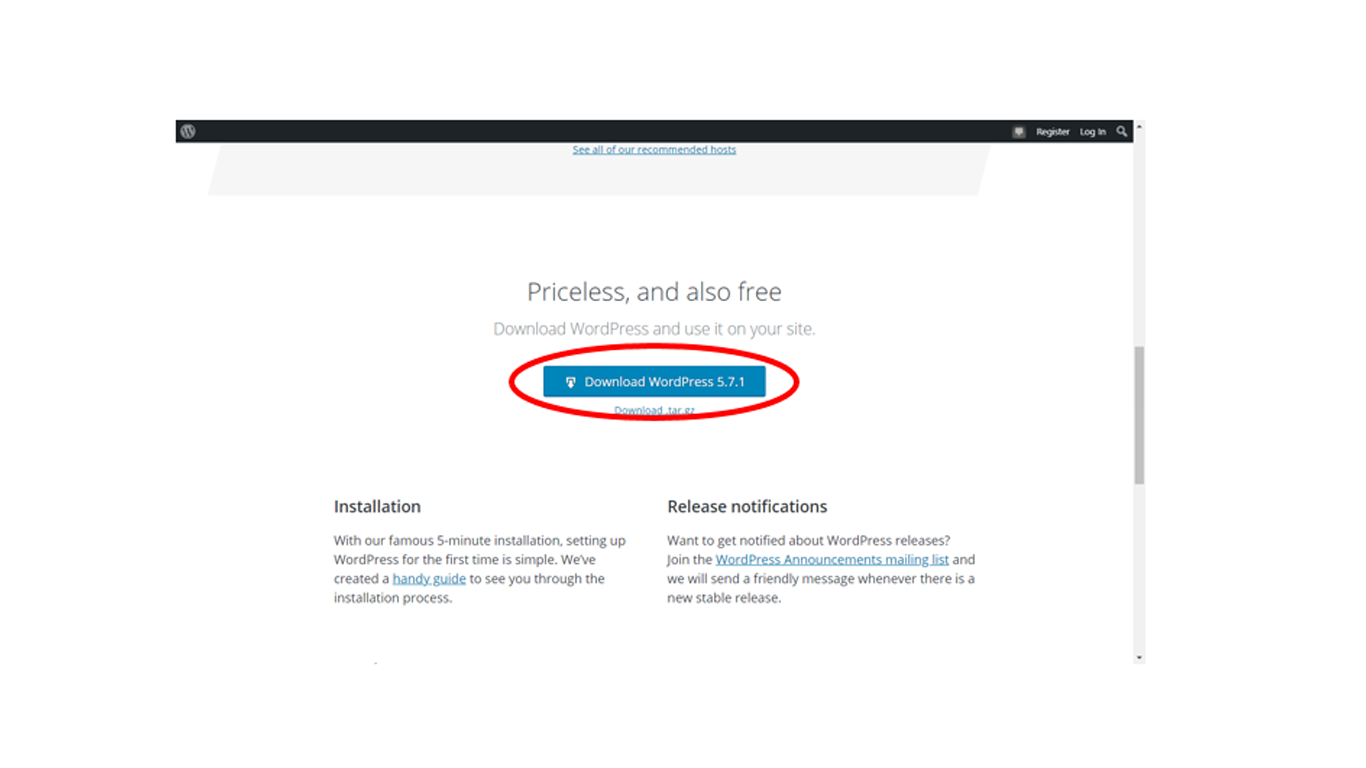
Step 1 : Download wordpress.

Download wordpress setup from wordpress.org . Download as A Zip Folder as shown below.

To Install WordPress Locally Using XAMPP
Step 2 : Create New Wordpess Project In XAMPP

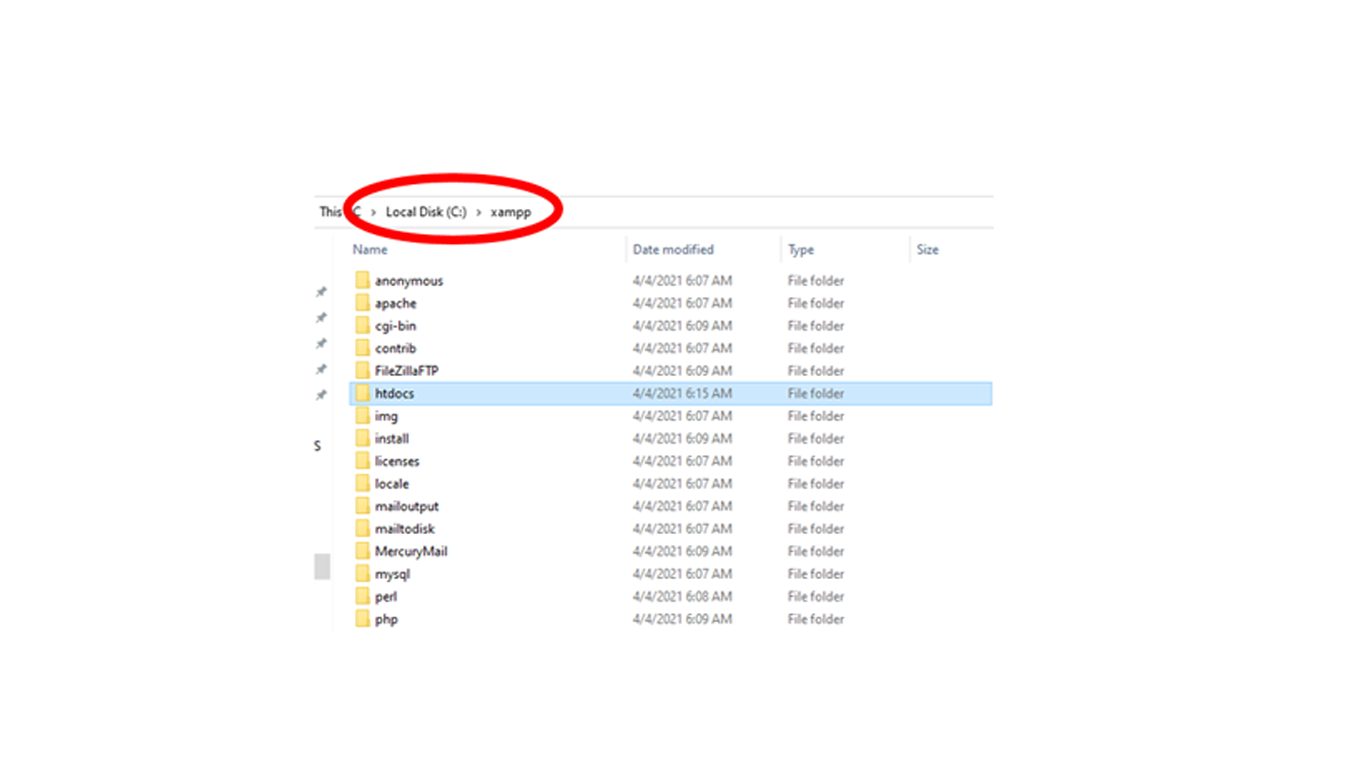
For instance navigate to the folder where you installed XAMPP. By default its C:\\xampp. It Should be same for you if while installing XAMPP you have not changed the path manually. After that find the htdocs subfolder

To Install WordPress Locally Using XAMPP

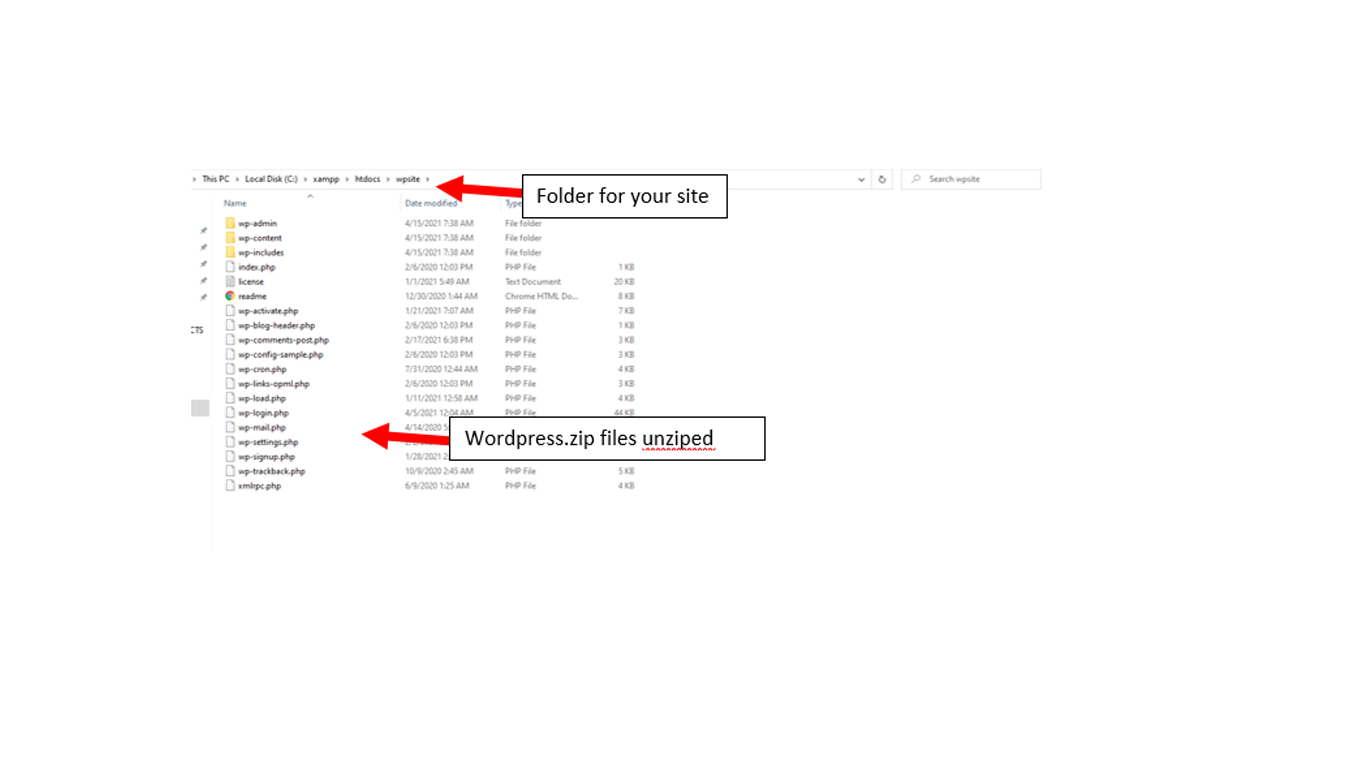
In htdocs, create a folder for your WordPress site. This folder name will need to be as the sub-name used to access your site. For example, if you make the folder wpsite, you’ll login using URL to your site by typing as http://localhost/wpsite .

After creating sub folder, unzip the WordPress.zip file you downloaded into folder you created.

To Install WordPress Locally Using XAMPP
Step 3 : Create Database for WordPress

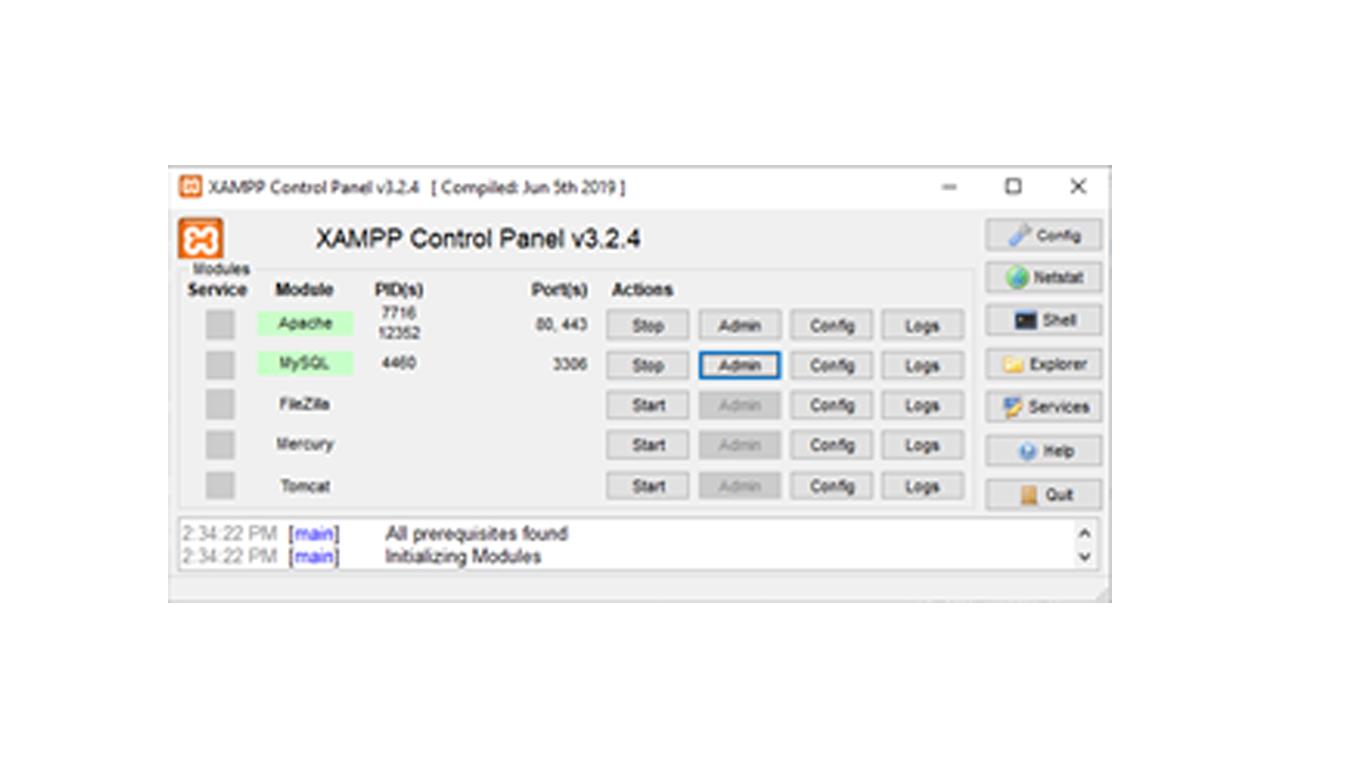
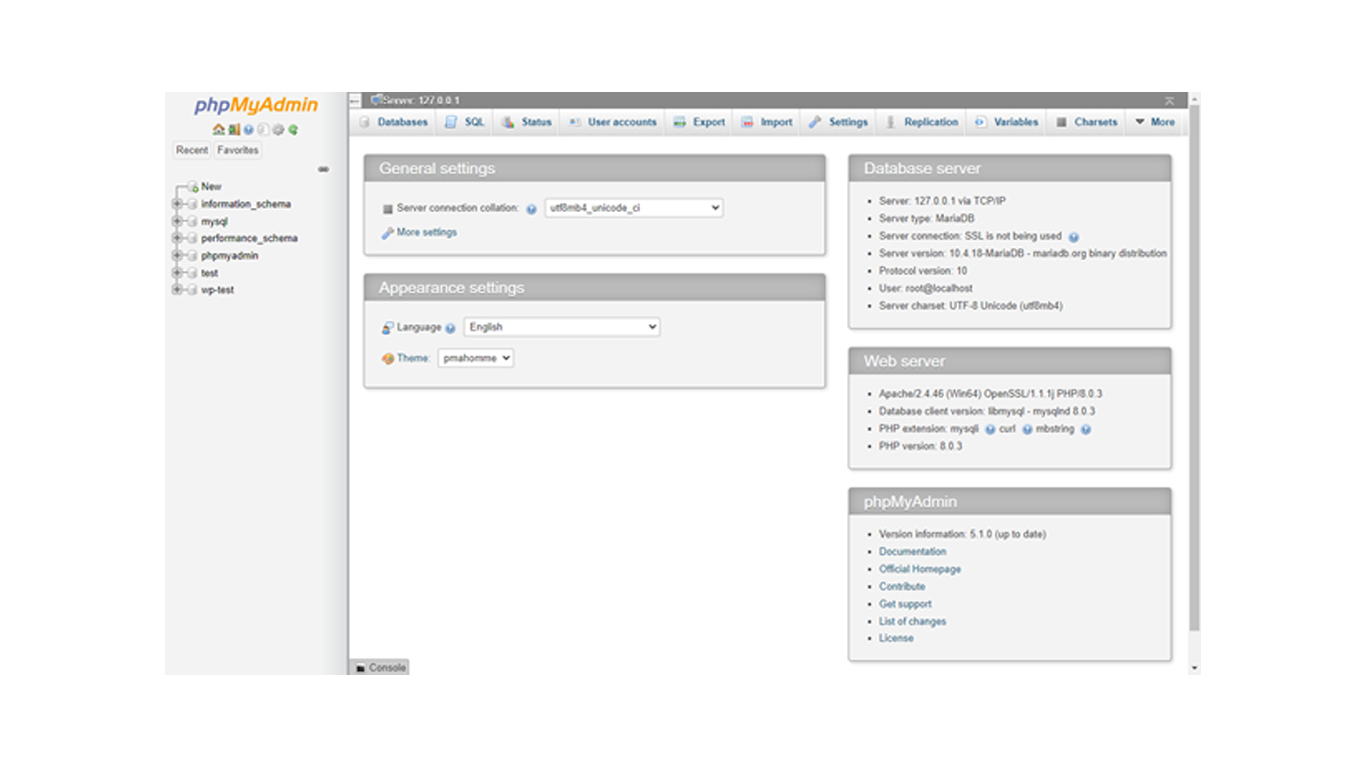
After Creating site, Now its time to created database for your wordpress. To create Database launch PHPMyAdmin from your XAMPP control panel by clicking on admin button in MYSQL row.

To Install WordPress Locally Using XAMPP

After that hit on New at left side in PHPMyAdmin.

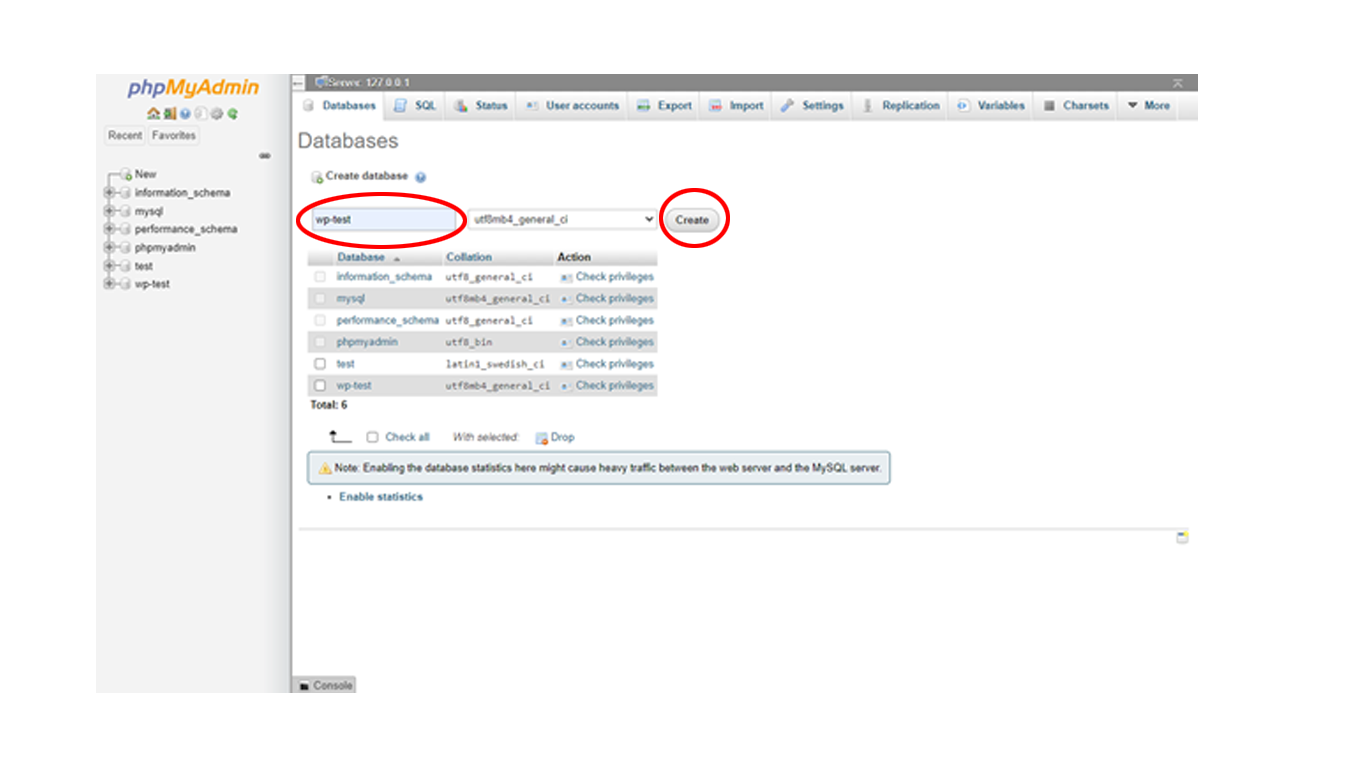
Finally you have to give appropriate Name of database and click on Create

PHPMYADMIN Database
Step 4 : Open Website to Start WordPress Installation

lastly we have to visit our website, Here you will see the normal WordPress installer. Note that your website link is http://localhost/subfoldername:

Now select your language and hit on continue to see the next page.
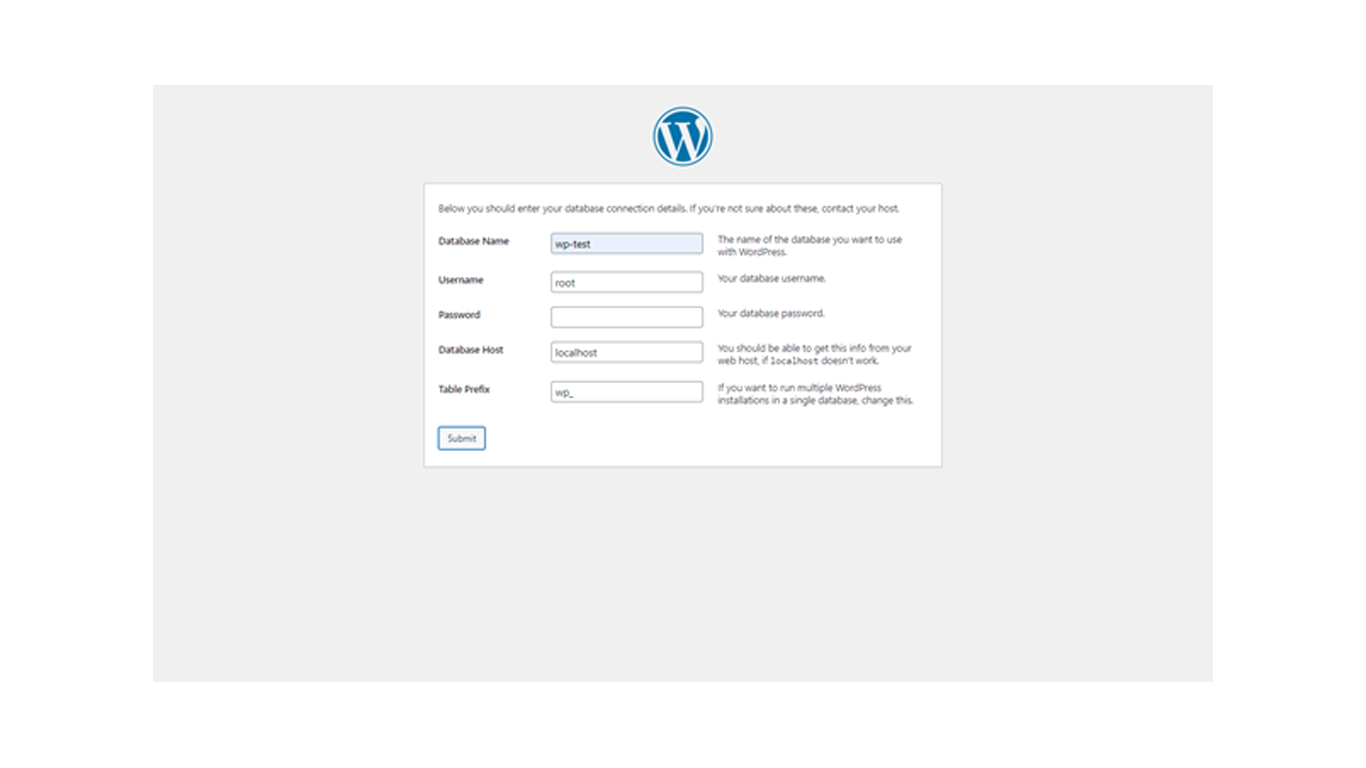
After that wordpress installer will ask you details of database. Here we need feed details you have already created ie database details that is ‘ Database Name / User ‘ you have created .

Wordpress Installation Details

Note that by default for Admin login username is root & password is for local XAMPP.

Step 5 : Start the Installation & Fill in Website General Details

Now click on sumbit & then on next page click on “Run the installation”

Here installer will ask other details like your Site Title, User Name & Password to login WP-Dashboard and your email.

Fill in following and click Install WordPress.
 

Complete the process ie installing wordpress locally using XAMPP on your local Machine process is completed !


Click Here To Join Our Facebook Group For More Tutorial & Tips.


Meaningful Gifts Businesses Can Provide to Loyal Customers This Christmas !

Meaningful Gifts Businesses Can Provide to Loyal Customers This Christmas !

In sales, you need to stay on your client’s mind to ensure they turn to you every time they need your product or service. One of the best ways of achieving this is through giving clients gifts of appreciation. While you’re welcome to go over the top and win their affections with a Fruit of the Month Club subscription, the following 21 ideas are a great and practical way to say ‘Thank You’ without stretching your budget.

1. Promotional Codes – Clients love e-mails thanking them for their business especially if they include promotional codes for generous discounts. These need to be generous because they’re special gifts to people who support your business and reel in prospective clients.

2. How-To Guide – Smart consumers always love learning something new. To tap into this, provide them a link to a 10-page how-to guide or a video related to your offerings.

3. Helpful eBooks – Share interesting eBooks on how to beat stress, manage work and home, etc.. These will teach important skills or healthy lifestyle habits, showing them that you truly care about them rather than their money.

4. Free Membership to Your New Loyalty Program – You can invite your most loyal clients to your new VIP loyalty program and give them a year’s membership for free. Just make sure that your program offers customers value or your gift is worthless.

5. A Charitable Gift – Making contributions to charity in your customers’ honor is a great way to show that you care about them and the world around you. Salespeople can donate a percentage of a sale to their favorite charity or plant a tree somewhere with their name. Just remember to send a receipt or a picture to prove this.

6. Provide a Surprise Upgrade – If you offer a loyalty program or delivery services, gift your customers a surprise limited-time upgrade. This will introduce them to a wider range of services, prompting them to pay for a permanent upgrade.

7. Give Out Free Coupons – Give your clients coupons to redeem at coffee shops or other outlets. While the discount will be nice, you can invest in 50 donuts, for instance, and circulate 50 free donut coupons around.

8. Refer Top Clients – If you’re a B2B salesperson, you can gift your clients with more clients of their own. You can have a Client of the Week page, highlighting how your own clients can benefit from striking deals with them.

9. Guest Blogging Invitation – If you’re a B2B salesperson and have a successful blog, invite your top three customers to become guest bloggers. They’ll appreciate the chance to showcase their expertise and spare you from having to research who they are and what they do before you can feature them.

10. Just Because Discounts – From time to time, reward your clients with a special discount on their bill just because. This will show your gratitude and coax buyers to make more purchases in hopes of another discount.

11. Branded Gifts – Invest in anything from paper clips to hoodies with the company’s logo or product emblem. Just make sure that you invest in something useful that won’t be hidden out of sight.

12. Fun, Free App – Apps are the rage nowadays. You can develop a fun or practical app and offer its download link to your clients. If you enable in-app purchases, they can buy more from you whenever they use the other functions of the app.

13. Virtual Calendar – Calendars are popular particularly if they contain attractive pictures that your clients would like to see on a daily basis. This way you don’t have to pay to have calendars printed.

14. Offer Free Shipping – Now who doesn’t appreciate getting free shipping? Select three clients and pay for their shipping to ensure their loyalty in the future.

15. Invite Them for a Test Drive – If you’re about to launch a new product or service, talk to the company and invite three to five clients to test it. This will give them a peek at your company’s future, making them feel special that you’ve selected them.

16. Handwritten Notes – As cliché as this may seem, customers love them because they show that you’ve taken the time to do something special for them. You can send these through direct mail to show your appreciation.

17. 24-Hour Brand Ambassador – Make one of your clients a brand ambassador for one day. They can complement your sales and marketing efforts while showing potential leads that you always reward top clients.

18. Item from Wishlist – If you’re following your clients or have a wishlist feature on your site, grant them something within your budget. Your client will appreciate receiving something they’ve been interested in.

Now some of these may mean spending a little from your own pocket, but you won’t be able to make money without investing a little. So don’t be afraid to go a little beyond ‘free’ from time to time.